New
Apr 21, 2020 2:16 PM
#451

Valerio_Lyndon said: Masuko-Senpai said: By default, the avatar retains its default dimensions and is placed centered horizontally and top-most vertically. To change this, you can either modify its placement by adding this to the bottom of your CSS:Also, My profile pic does not seem to fit in the circle box /* Avatar Positioning */
.status-menu::after { background-position: center top; }Or, modify its sizing by adding one of these. The "Contain" one will size the image down so you can see all of it, but there will be some blank space. The "Stretch" one will stretch the image to fill out the entire space. /* Avatar Sizing - Contain */
.status-menu::after { background-size: contain; }/* Avatar Sizing - Stretch */
.status-menu::after { background-size: 100% 100%; }Masuko-Senpai said: There's some code you can insert to change banner or character images under the "Further Modification" section in the main post. It's under the first spoiler, "Change theme images". You can also find code for a per-section/category banner image there as well. But, you can't find per-category avatar code. So, here's the CSS you can use for per-category banners and avatars. Add it to the bottom of your CSS. Then, replace each "URLHERE" with the URLs to your images. I can't seem to find the code to where i can change the banner at the top. … I wanna add in a custom banner and profile pic for each list. /*-S-T-A-R-T--------------------*\
| Per-Category Banner Image |
\*------------------------------*/
/* All Anime */
[data-query*='status":7'] { --banner: url(URLHERE); }
/* Watching/Reading */
[data-query*='status":1'] { --banner: url(URLHERE); }
/* Completed */
[data-query*='status":2'] { --banner: url(URLHERE); }
/* Onhold */
[data-query*='status":3'] { --banner: url(URLHERE); }
/* Dropped */
[data-query*='status":4'] { --banner: url(URLHERE); }
/* Planned */
[data-query*='status":6'] { --banner: url(URLHERE); }
/*------------------------E-N-D-*/
/*-S-T-A-R-T--------------------*\
| Per-Category Avatar Image |
\*------------------------------*/
/* All Anime */
[data-query*='status":7'] { --avatar: url(URLHERE); }
/* Watching/Reading */
[data-query*='status":1'] { --avatar: url(URLHERE); }
/* Completed */
[data-query*='status":2'] { --avatar: url(URLHERE); }
/* Onhold */
[data-query*='status":3'] { --avatar: url(URLHERE); }
/* Dropped */
[data-query*='status":4'] { --avatar: url(URLHERE); }
/* Planned */
[data-query*='status":6'] { --avatar: url(URLHERE); }
/*------------------------E-N-D-*/And if you need it: /*-S-T-A-R-T--------------------*\
| Per-Category Character Image |
\*------------------------------*/
/* All Anime */
[data-query*='status":7'] { --character: url(URLHERE); }
/* Watching/Reading */
[data-query*='status":1'] { --character: url(URLHERE); }
/* Completed */
[data-query*='status":2'] { --character: url(URLHERE); }
/* Onhold */
[data-query*='status":3'] { --character: url(URLHERE); }
/* Dropped */
[data-query*='status":4'] { --character: url(URLHERE); }
/* Planned */
[data-query*='status":6'] { --character: url(URLHERE); }
/*------------------------E-N-D-*/Masuko-Senpai said: The avatar is 150x150 pixels, but any square image will fit apppropriately and we went over the stretching/positioning options earlier in this post.Do you know what the exact dimensions they have to be in order for them to fit. The banner will accept any dimension and resolution image, it doesn't really matter. But if you're concerned about it, you can crop images down to a 10:3 width/height ratio. This is because any vertical imagery above a 10:3 ratio image will never be shown. So, if your image was 1920x1080, it would have around 500 pixels vertically that are never going to be seen. A 10:3 ratio image, at 1080p, comes out to 1920x576. You can figure out aspect ratios by using [this website]. Just put a 10:3 ratio on the left side, and a new width or height on the right, and it'll calculate it for you. 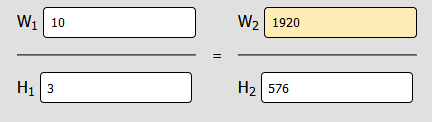 Character images can, once again, be any size. But, the ideal size is 318 pixels vertically, assuming the page is not zoomed in at all. The width does not matter. That said, I really wouldn't worry much about sizing your images perfectly on your monitor. The banner height is not dynamic, where-as the width is, so on some monitors it will be 1280 pixels, and on others it can get up to 3840 pixels wide. All the while, the height will always be 318 pixels. So you have one person who might require a 1920x318 image to fit perfectly, and someone else a 1280x318. These are quite different numbers, and there is going to be some cropping on someone's monitor. So as long as it looks fine to you, I wouldn't worry. And as for resizing it down (for instance, sizing your character render down to 318 pixels vertically), it's great for optimization, but then what if someone on a 4K monitor zooms in their page to see better? That 318 pixel picture will now be in a size closer to 500 or 600, most likely. So if your images are a bit big, it's not the end of the world. Thanks. I can't seem to get the image to show up where the banner is. When i put the image url in the brackets and click preview the It's just black with the character... 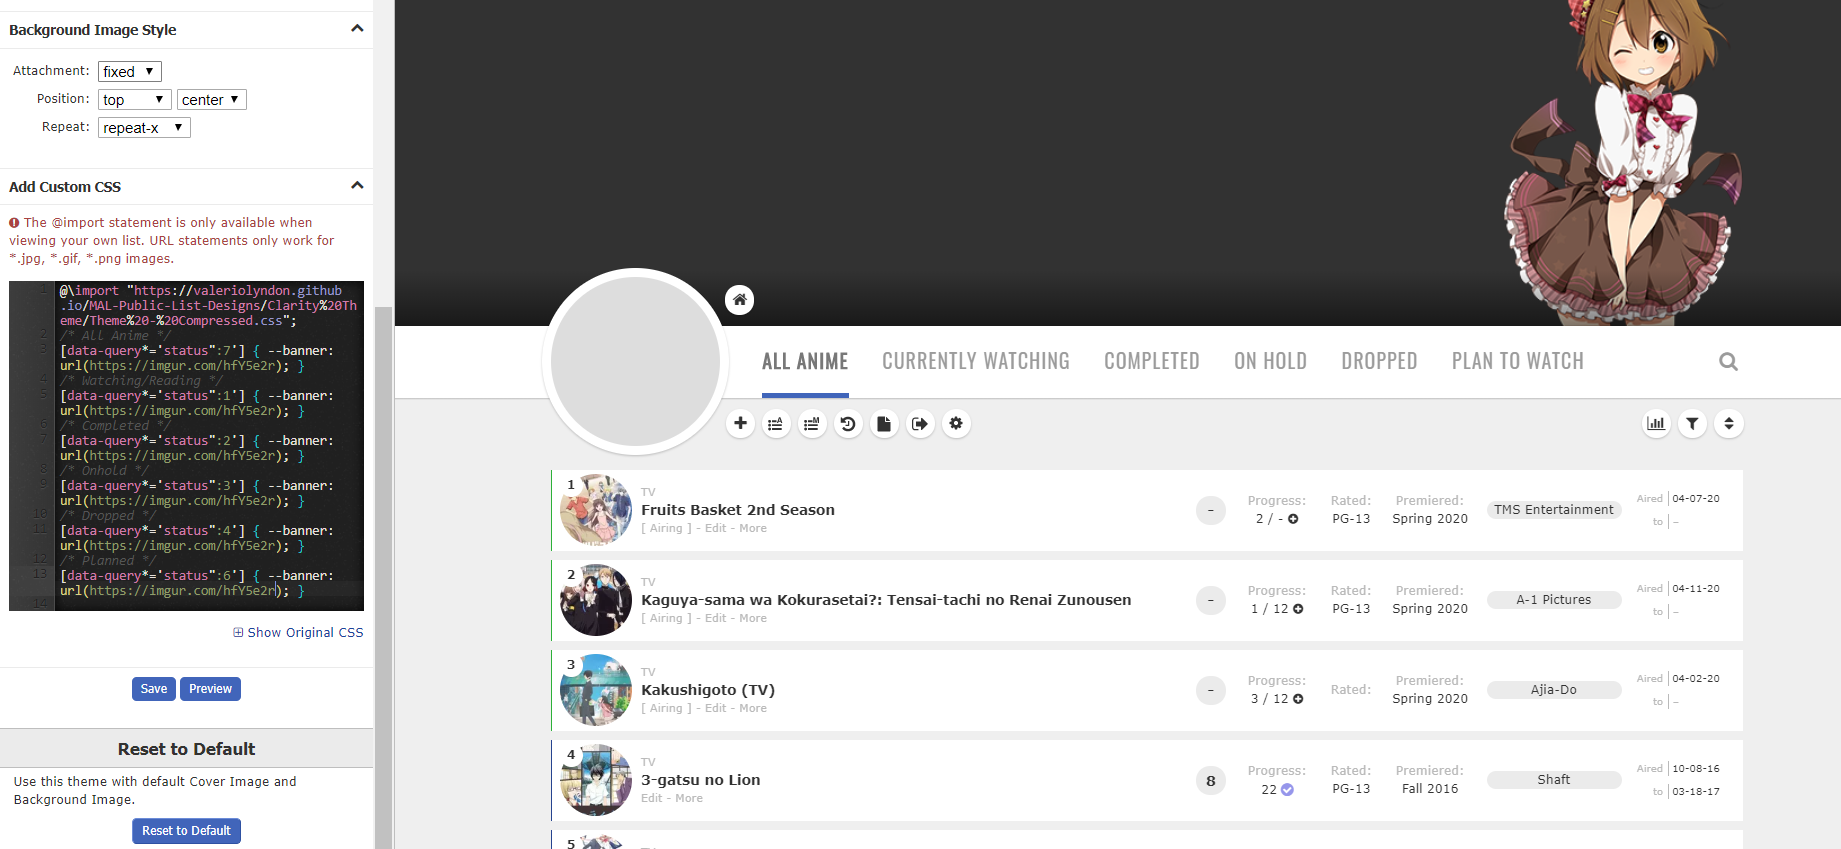 /* All Anime */
[data-query*='status":7'] { --banner: url(https://imgur.com/hrRa5pD); }
/* Watching/Reading */
[data-query*='status":1'] { --banner: url(https://imgur.com/hrRa5pD); }
/* Completed */
[data-query*='status":2'] { --banner: url(https://imgur.com/hrRa5pD); }
/* Onhold */
[data-query*='status":3'] { --banner: url(https://imgur.com/hrRa5pD); }
/* Dropped */
[data-query*='status":4'] { --banner: url(https://imgur.com/hrRa5pD); }
/* Planned */
[data-query*='status":6'] { --banner: url(https://imgur.com/hrRa5pD); } |
MasukoApr 21, 2020 2:20 PM
    "If you smile when you see a butterfly ,you have happiness In your eyes" |
Apr 21, 2020 10:39 PM
#452
Masuko-Senpai said: You're linking to the Imgur album page, rather than the direct image link. CSS only recognizes the link when it is the direct link to the image. For instance: https://i.imgur.com/hrRa5pD.png This url ends in a file extension (.png) so it's a pretty safe bet it's the direct link. And when you visit it, the only thing visible is the image. Imgur finds it a little hard to find these direct links because they're annoying, but you can either find it buried within some of the share links or right click your image and select "Copy Image Location" or "Copy Image Address" (or similar).Thanks. I can't seem to get the image to show up where the banner is. When i put the image url in the brackets and click preview the It's just black with the character... /* All Anime */
[data-query*='status":7'] { --banner: url(https://imgur.com/hrRa5pD); }
/* Watching/Reading */
[data-query*='status":1'] { --banner: url(https://imgur.com/hrRa5pD); }
/* Completed */
[data-query*='status":2'] { --banner: url(https://imgur.com/hrRa5pD); }
/* Onhold */
[data-query*='status":3'] { --banner: url(https://imgur.com/hrRa5pD); }
/* Dropped */
[data-query*='status":4'] { --banner: url(https://imgur.com/hrRa5pD); }
/* Planned */
[data-query*='status":6'] { --banner: url(https://imgur.com/hrRa5pD); }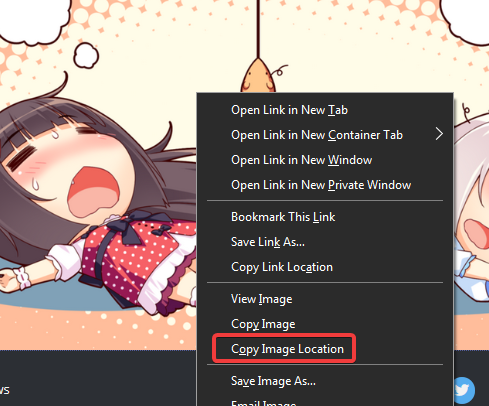 |
Apr 21, 2020 10:56 PM
#453
FiliCZ said: You've got a couple of options.Hey, one more thing. When I'm scrolled all the way up the character render is covered by the navbar, but I don't really want to make her smaller. Would it be possible to change her size depending on how far I'm scrolled so she's always shown entirely with her head just below the navbar? You can use this modded version, which will downsize and upsize it depending on if you've scrolled past the header or not. [Preview] (That's as smooth as I can make the transition.) Replace your current image render modification with this new one. /*-S-T-A-R-T--------------------*\
| Character Renders Modded |
\*------------------------------*/
.list-block::before, .list-block::after {
content: "";
position: fixed;
bottom: 0;
z-index: -1;
width: calc(50% - 538px);
min-width: 200px;
height: calc(100% - 382px);
background: transparent no-repeat center bottom / contain scroll;
transition: height 0.5s ease;
}
.fixed + .list-block::before, .fixed + .list-block::after {
height: 100%;
}
/* Left Render */
.list-block::before {
right: calc(100% - (50% - 538px));
background-image: url(URLHERE);
background-position: left bottom;
}
/* Right Render */
.list-block::after {
left: calc(100% - (50% - 538px));
background-image: url(https://image.myanimelist.net/ui/5LYzTBVoS196gvYvw3zjwMy92fXiMm1VLO6h46Lgilo);
background-position: right bottom;
}
/*------------------------E-N-D-*/Or, you could simply increase the z-index value on your current render code to "100", which will make it display above the banner.  |
Apr 22, 2020 6:53 AM
#454

Valerio_Lyndon said: Or, you could simply increase the z-index value on your current render code to "100", which will make it display above the banner. Yeah that looks fine, but now I have an idea, that instead of going under the navbar she could just go under the footer. So she would be fixed under the navbar. Is that possible? |
 |
Apr 22, 2020 7:03 PM
#455
FiliCZ said: Hmm, I'm not quite sure I get what you mean. Sort of like this, or am I way off? Valerio_Lyndon said: Or, you could simply increase the z-index value on your current render code to "100", which will make it display above the banner. Yeah that looks fine, but now I have an idea, that instead of going under the navbar she could just go under the footer. So she would be fixed under the navbar. Is that possible?  If that's what you wanted, here's the code. Replace your current image render modification with this new one. /*-S-T-A-R-T--------------------*\
| Character Renders Modded |
\*------------------------------*/
.list-block::before, .list-block::after {
content: "";
position: absolute;
top: 382px;
z-index: -1;
width: calc(50% - 538px);
min-width: 262px;
height: 100vh;
background: transparent no-repeat center bottom / contain scroll;
}
.fixed + .list-block::before, .fixed + .list-block::after {
position: fixed;
top: 0;
}
/* Right Render */
.list-block::before {
right: calc(100% - (50% - 538px));
background-image: url(https://image.myanimelist.net/ui/5LYzTBVoS196gvYvw3zjwMpElTOJeTJ_Uy-oWIigkzM);
background-position: left bottom;
}
.list-block::before {
right: calc(100% - (50% - 538px));
}
/* Right Render */
.list-block::after {
left: calc(100% - (50% - 538px));
background-image: url(https://image.myanimelist.net/ui/5LYzTBVoS196gvYvw3zjwMpElTOJeTJ_Uy-oWIigkzM);
background-position: right bottom;
}
.list-block::after {
left: calc(100% - (50% - 538px));
}
/*------------------------E-N-D-*/ |
Apr 23, 2020 4:47 AM
#456
Valerio_Lyndon said: Hmm, I'm not quite sure I get what you mean. Sort of like this, or am I way off? Yeah, that's exactly what I wanted but now i have run into this problem, when there's too few items in one section:  Is there a way to fix it? Here's my code now cause I moddified it for the left render: /*-S-T-A-R-T--------------------*\
| Character Renders Modded |
\*------------------------------*/
.list-block::before, .list-block::after {
content: "";
position: absolute;
top: 382px;
z-index: -1;
width: calc(50% - 538px);
min-width: 262px;
height: 100vh;
background: transparent no-repeat center bottom / contain scroll;
}
.fixed + .list-block::before, .fixed + .list-block::after {
position: fixed;
top: 0;
}
/* Left Render */
.list-block::before {
right: calc(100% - (75% - 538px));
width: calc(75% - 538px);
min-width: 505px;
background-image: url(https://i.imgur.com/jNChOMa.png);
background-position: left bottom;
}
.list-block::before {
right: calc(100% - (70% - 538px));
}
/* Right Render */
.list-block::after {
left: calc(100% - (50% - 538px));
background-image: url(https://i.imgur.com/Gz8w9Ze.png);
background-position: right bottom;
}
.list-block::after {
left: calc(100% - (50% - 538px));
}
/*------------------------E-N-D-*/ |
|
Apr 23, 2020 12:48 PM
#457

| Is there a way to make comments show up on this layout? |
Apr 23, 2020 1:59 PM
#458
manaphy909 said: Click on the "More" button for any entry. That will display the comments. Unfortunately, they are not loaded until the button is clicked and there isn't yet a way to auto-load them.Is there a way to make comments show up on this layout? |
Apr 23, 2020 3:06 PM
#459
FiliCZ said: Ah, damn. Wrote that code while tired, and it shows, lol. Version 3, here we go. I'm not fully satisfied with behaviour on horizontally-limited screens, but there shouldn't be any screen overflow issues anymore. I tried overengineering a solution to make it work the same as before on thin screens, but no fruits on that yet.Yeah, that's exactly what I wanted but now i have run into this problem, when there's too few items in one section: https://i.imgur.com/cthZXZ9.png Is there a way to fix it? Here's my code now cause I moddified it for the left render: /*-S-T-A-R-T--------------------*\
| Character Renders Modded |
\*------------------------------*/
.list-block::before, .list-block::after {
content: "";
position: absolute;
top: 382px;
z-index: -1;
width: calc(50% - 538px);
min-width: 262px;
height: 100vh;
background: transparent no-repeat center bottom / contain scroll;
}
.fixed + .list-block::before, .fixed + .list-block::after {
position: fixed;
top: 0;
}
/* Left Render */
.list-block::before {
right: calc(100% - (75% - 538px));
width: calc(75% - 538px);
min-width: 505px;
background-image: url(https://i.imgur.com/jNChOMa.png);
background-position: left bottom;
}
.list-block::before {
right: calc(100% - (70% - 538px));
}
/* Right Render */
.list-block::after {
left: calc(100% - (50% - 538px));
background-image: url(https://i.imgur.com/Gz8w9Ze.png);
background-position: right bottom;
}
.list-block::after {
left: calc(100% - (50% - 538px));
}
/*------------------------E-N-D-*//*-S-T-A-R-T--------------------*\
| Character Renders Modded |
\*------------------------------*/
.list-block::before, .list-block::after {
content: "";
position: absolute;
top: 382px;
z-index: -1;
width: calc(50% - 538px);
height: calc(100% - 382px);
max-height: 100vh;
background: transparent no-repeat center bottom / contain scroll;
}
.fixed + .list-block::before, .fixed + .list-block::after {
position: fixed;
top: 0;
height: 100%;
}
/* Left Render */
.list-block::before {
right: calc(100% - (50% - 274px));
width: calc(50% - 274px);
background-image: url(https://i.imgur.com/jNChOMa.png);
background-position: left bottom;
}
/* Right Render */
.list-block::after {
left: calc(100% - (50% - 538px));
background-image: url(https://i.imgur.com/Gz8w9Ze.png);
background-position: right bottom;
}
/*------------------------E-N-D-*/ |
Apr 24, 2020 1:27 AM
#460

| @Valerio_Lyndon Hi, so I'm not sure since when but people other than me have become unable to see my banner. They only see a black banner with the name. Would you please look at this code and tell me what happened? @import url('https://fonts.googleapis.com/css?family=Philosopher'); @import "https://valeriolyndon.github.io/MAL-Public-List-Designs/Clarity%20Theme/Theme%20-%20Compressed.css"; @import "https://valeriolyndon.github.io/MAL-Public-List-Designs/Clarity%20Theme/Mod%20-%20Dark%20Mode%20Compressed.css"; @import "https://malscraper.azurewebsites.net/covers/auto/presets/dataimagelinkbefore"; @import "https://valeriolyndon.github.io/MAL-Public-List-Designs/Clarity%20Theme/Mod%20-%20Hover%20Image%20Compressed.css"; :root { --avatar: url(https://i.imgur.com/LCpvBLm.gif); } :root { --banner: url(https://i.imgur.com/VbSEHWa.png); } :root { --character: none; } :root { --name: "Neil'sa List"; } body { --background: url(https://i.imgur.com/NVFo6bf.jpg); background-image: linear-gradient(rgba(0,0,0,0.5), rgba(0,0,0,0.5)), var(--background) !important; } #cover-image-container::after { left: auto; right: 50%; margin-right: -200px; font-size: 50px; color: #fbf7eb; text-shadow: 2px 2px 8px #cba62b; font-family: Philosopher; } /* Transparent List Items */ .list-item, .data.priority, .data.number, .status:before, .status:after { background: transparent no-repeat center / cover fixed !important; background-image: linear-gradient(rgba(33,33,33,0.8),rgba(33,33,33,0.8)), var(--background) !important; } |
neilApr 24, 2020 1:44 AM
 |
Apr 24, 2020 1:52 AM
#461
| @neil Looks to be an issue with MAL's image re-hosting solution. When the list is viewed by anyone that isn't the owner of the list, the image is sent through MAL's servers to rehost it (MAL's attempt to improve security). Currently, it's returning a server error when trying to view that specific image. Yet, nothing is wrong with the CSS you've posted. We were having the same issue about a week or two ago, it got fixed, but now it seems to have sprung up again; Someone just started a thread in the support board about it. So, unfortunately, we'll probably just have to wait while MAL fixes their servers (again). |
Apr 24, 2020 5:02 AM
#462
Valerio_Lyndon said: Ah, damn. Wrote that code while tired, and it shows, lol. Version 3, here we go. I'm not fully satisfied with behaviour on horizontally-limited screens, but there shouldn't be any screen overflow issues anymore. I tried overengineering a solution to make it work the same as before on thin screens, but no fruits on that yet. Thanks, now it's perfect. I appreciate you're so willing to help so I'm glad I chose your design. Hopefully I won't annoy you with something again any time soon :D |
FiliCZApr 24, 2020 5:16 AM
|
Apr 24, 2020 6:50 AM
#463

| Sorry for bothering you, but is it possible to have titles which are too long start on a new line instead? e.g.  |
| Cosplayer, Photographer, & Journalist. ========= Discord► Yoshe#7068 Instagram► yoshe_plays Other Social Media Links► YoshePlays  |
Apr 25, 2020 2:21 AM
#464
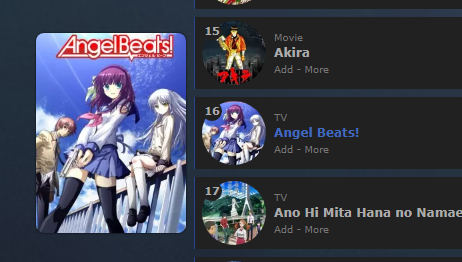
YoshePlays said: It's possible, but isn't compatible with the current positioning on the "type" column (where it says "TV", "OVA", "Movie", etc). So you'll have to either disable the type column or revert it to its default position using the code in the spoiler below. Add any new code you add to the bottom of your CSS.Sorry for bothering you, but is it possible to have titles which are too long start on a new line instead? e.g. https://i.imgur.com/JGPe5mv.jpg /*-S-T-A-R-T--------------------*\
| Overflow Titles R2.0 |
\*------------------------------*/
.data.title {
height: auto;
padding: 8px !important;
}
.data.title::after {
content: none;
}
.data.title .link.sort {
position: static;
padding-right: 0;
white-space: normal;
float: left;
}
.content-status, .rewatching, .rereading {
clear: left;
float: left;
margin-right: 3px;
}
.list-table .list-table-data .data.title .add-edit-more {
float: left !important;
}
.rewatching[style*="none"] + .content-status[style*="none"] + .add-edit-more,
.rereading[style*="none"] + .content-status[style*="none"] + .add-edit-more {
clear: left;
}
/*------------------------E-N-D-*//*-S-T-A-R-T--------------------*\
| Revert Type Location R1.0 |
\*------------------------------*/
.data.type {
position: static;
width: 72px;
padding: 0 !important;
margin-right: 3px;
order: 16;
text-align: center !important;
}
/*------------------------E-N-D-*/There's alternatively the option to only display the full titles on hover, which would not require a repositioning of the type column.  /*-S-T-A-R-T--------------------*\
| Overflow Titles on Hover R2.0 |
\*------------------------------*/
.data.title .link.sort {
display: block;
height: 16px;
border-radius: 3px;
overflow: hidden;
transition: none !important;
} .data.title .link.sort:hover {
top: 24px;
z-index: 2;
height: auto;
padding: 2px 4px;
background: var(--btn-bg);
margin: 0 8px 0 -4px;
white-space: normal;
transform: translateY(-50%);
}
/*------------------------E-N-D-*/ |
May 10, 2020 5:00 PM
#465
| This layout is amazing ! Thank you so much for making it, my list looks so good now ! If I had one request, that would be having a way to add the "fave heart" to a specific anime, not based on tags (for when you run out of tag space). |
May 10, 2020 9:41 PM
#466
Endersteph said: If I had one request, that would be having a way to add the "fave heart" to a specific anime, not based on tags (for when you run out of tag space). It's possible to do with some extra CSS, although still requires manual modification and cannot auto-detect your MAL favourites. I hadn't bothered writing up this solution before due to it being harder to add/manage and lacking features in that the favourite heart will no longer be clickable. Also, tags still need to be enabled here, but that's simply because I chose the easiest CSS selector that was least likely to cause conflicts. It could be made to work without tags being enabled, for sure. Here's the alternate code. It requires editing every time you want to add or remove an entry. /*-S-T-A-R-T--------------------*\
| Favourite Entries (Tagless) |
\*------------------------------*/
/* Add or remove entries here
* Make sure each entry is comma-separated
*/
.anime #tags-ID::after
/* Styling of the heart */
{
content: "♥";
position: absolute;
left: -34px;
top: calc(50% - 13px);
width: 26px;
height: 26px;
background: var(--bg);
border-radius: 50%;
color: #ff65ad;
font-size: 26px;
line-height: 23px;
box-shadow: 0 1px 2px rgba(0,0,0,0.2);
}
/*------------------------E-N-D-*/
.anime #tags-41120::after, .anime #tags-40221::after, .manga #tags-111512::after |

Valerio_LyndonMay 10, 2020 9:44 PM
May 11, 2020 3:44 AM
#467
Valerio_Lyndon said: Endersteph said: If I had one request, that would be having a way to add the "fave heart" to a specific anime, not based on tags (for when you run out of tag space). It's possible to do with some extra CSS, although still requires manual modification and cannot auto-detect your MAL favourites. I hadn't bothered writing up this solution before due to it being harder to add/manage and lacking features in that the favourite heart will no longer be clickable. Also, tags still need to be enabled here, but that's simply because I chose the easiest CSS selector that was least likely to cause conflicts. It could be made to work without tags being enabled, for sure. Here's the alternate code. It requires editing every time you want to add or remove an entry. /*-S-T-A-R-T--------------------*\
| Favourite Entries (Tagless) |
\*------------------------------*/
/* Add or remove entries here
* Make sure each entry is comma-separated
*/
.anime #tags-ID::after
/* Styling of the heart */
{
content: "♥";
position: absolute;
left: -34px;
top: calc(50% - 13px);
width: 26px;
height: 26px;
background: var(--bg);
border-radius: 50%;
color: #ff65ad;
font-size: 26px;
line-height: 23px;
box-shadow: 0 1px 2px rgba(0,0,0,0.2);
}
/*------------------------E-N-D-*/
.anime #tags-41120::after,
.anime #tags-40221::after,
.manga #tags-111512::after
Thank you so much ! It's exactly what I needed :) |
May 20, 2020 9:38 AM
#468

| Great layout. Sorry if this has been asked before, but how can I move the status (Airing, Rewatching, etc.) next to the anime title, and also remove the "-" in between "Edit" and "More"? Tried a bunch of stuff with CSS, but I can't seem to find out how to remove the span completely. |
May 20, 2020 8:12 PM
#469
Cosmincreato said: Add to the bottom of your CSS. It's not perfect but it'll do what you request.Great layout. Sorry if this has been asked before, but how can I move the status (Airing, Rewatching, etc.) next to the anime title, and also remove the "-" in between "Edit" and "More"? Tried a bunch of stuff with CSS, but I can't seem to find out how to remove the span completely. /* =========================
Reposition Content Status */
.data.title {
height: 32px;
padding-top: 16px !important;
}
.data.title > * {
vertical-align: baseline;
margin-right: 3px;
}
.data.title .link.sort {
position: static;
padding-right: 0;
vertical-align: top;
max-width: calc(100% - 90px);
}
.list-table .list-table-data .data.title .add-edit-more {
display: block;
}
/* ================================
Remove Dashes from Add-Edit-More */
.list-table .list-table-data .data.title .add-edit-more {
font-size: 0;
}
.add-edit-more a {
font-size: 11px;
margin-right: 6px;
} |
May 20, 2020 10:24 PM
#470
Valerio_Lyndon said: Cosmincreato said: Add to the bottom of your CSS. It's not perfect but it'll do what you request.Great layout. Sorry if this has been asked before, but how can I move the status (Airing, Rewatching, etc.) next to the anime title, and also remove the "-" in between "Edit" and "More"? Tried a bunch of stuff with CSS, but I can't seem to find out how to remove the span completely. /* =========================
Reposition Content Status */
.data.title {
height: 32px;
padding-top: 16px !important;
}
.data.title > * {
vertical-align: baseline;
margin-right: 3px;
}
.data.title .link.sort {
position: static;
padding-right: 0;
vertical-align: top;
max-width: calc(100% - 90px);
}
.list-table .list-table-data .data.title .add-edit-more {
display: block;
}
/* ================================
Remove Dashes from Add-Edit-More */
.list-table .list-table-data .data.title .add-edit-more {
font-size: 0;
}
.add-edit-more a {
font-size: 11px;
margin-right: 6px;
}Thank you, it's perfect! Keep up the great work! |
Jun 7, 2020 1:11 PM
#471
| Has the "category headers on the All Anime page" mod stopped working for anyone else? I know I added the code in correctly, because it was working for the last week, but it stopped yesterday and today, and I haven't changed anything. |
Jun 7, 2020 9:17 PM
#472
kfk said: Hmm, it seems to have stopped working for me as well. That's quite unfortunate. Unfortunately, the tool is run by someone else (who is long-since inactive) and I don't think I can personally get them back up and running. You could leave the addon enabled to see if it re-enables if you wish, as it may just be a short-term outage bug. But I would not hold out too much hope.Has the "category headers on the All Anime page" mod stopped working for anyone else? I know I added the code in correctly, because it was working for the last week, but it stopped yesterday and today, and I haven't changed anything. |
Jun 19, 2020 9:15 AM
#473
Valerio_Lyndon said: kfk said: Hmm, it seems to have stopped working for me as well. That's quite unfortunate. Unfortunately, the tool is run by someone else (who is long-since inactive) and I don't think I can personally get them back up and running. You could leave the addon enabled to see if it re-enables if you wish, as it may just be a short-term outage bug. But I would not hold out too much hope.Has the "category headers on the All Anime page" mod stopped working for anyone else? I know I added the code in correctly, because it was working for the last week, but it stopped yesterday and today, and I haven't changed anything. It appears to be working again! c: Also, additional question, is it possible to use the favourite hearts feature even though my tags are used as reviews/notes? Is there another detection method for the favourite hearts feature in which I can input manually? |
| Cosplayer, Photographer, & Journalist. ========= Discord► Yoshe#7068 Instagram► yoshe_plays Other Social Media Links► YoshePlays |
Jun 20, 2020 5:22 PM
#474
YoshePlays said: Valerio_Lyndon said: Hmm, it seems to have stopped working for me as well. … You could leave the addon enabled to see if it re-enables if you wish, as it may just be a short-term outage bug. But I would not hold out too much hope. It appears to be working again! c: Glad to hear that! Not sure what was breaking it, but hopefully it continues to work from now on. YoshePlays said: Also, additional question, is it possible to use the favourite hearts feature even though my tags are used as reviews/notes? Is there another detection method for the favourite hearts feature in which I can input manually? The default code won't work, but you could use this modified version. The only thing to keep in mind is you must place the "Favourite" tag after your review. If you place the tag at the start, your review will have a random comma at the beginning of it, which would be undesired. This is just a side effect of this kind of work-around. /*-S-T-A-R-T--------------------*\
| Favourite Hearts (Left) R0.4 |
| Modified for use with reviews |
\*------------------------------*/
.data.tags span { padding: 0; }
.data.tags span a { margin: 1px 0; }
.data.tags span a[href$="=Favourite"], .data.tags span a[href$="=Favorite"] {
position: absolute;
left: -34px;
top: calc(50% - 13px);
width: 26px;
height: 26px;
padding: 0;
background: var(--bg);
border-radius: 50%;
color: #ff65ad !important;
font-size: 0 !important;
line-height: 23px;
overflow: hidden;
box-shadow: 0 1px 2px rgba(0,0,0,0.2);
pointer-events: auto;
} .data.tags span a[href$="=Favourite"]:before, .data.tags span a[href$="=Favorite"]:before { content: "♥"; font-size: 26px; }
/* Replace HTML commas with CSS so that we can manipulate it based on selector. */
.data.tags span {
font-size: 0 !important;
}
.data.tags span + span a::before {
content: ", ";
}
/*------------------------E-N-D-*//*-S-T-A-R-T--------------------*\
| Favourite Hearts (Right) R0.4 |
| Modified for use with reviews |
\*------------------------------*/
.data.tags span { padding: 0; }
.data.tags span a { margin: 1px 0; }
.data.tags span a[href$="=Favourite"], .data.tags span a[href$="=Favorite"] {
position: absolute;
right: -34px;
top: calc(50% - 13px);
width: 26px;
height: 26px;
padding: 0;
background: var(--bg);
border-radius: 50%;
color: #ff65ad !important;
font-size: 0 !important;
line-height: 23px;
overflow: hidden;
box-shadow: 0 1px 2px rgba(0,0,0,0.2);
pointer-events: auto;
} .data.tags span a[href$="=Favourite"]:before, .data.tags span a[href$="=Favorite"]:before { content: "♥"; font-size: 26px; }
/* Replace HTML commas with CSS so that we can manipulate it based on selector. */
.data.tags span {
font-size: 0 !important;
}
.data.tags span + span a::before {
content: ", ";
}
/*------------------------E-N-D-*/ |
Jun 20, 2020 10:30 PM
#475
Valerio_Lyndon said: Glad to hear that! Not sure what was breaking it, but hopefully it continues to work from now on. The default code won't work, but you could use this modified version. The only thing to keep in mind is you must place the "Favourite" tag after your review. If you place the tag at the start, your review will have a random comma at the beginning of it, which would be undesired. This is just a side effect of this kind of work-around. Sorry for bothering you again, but just for your information, the warning tag at the front page regarding how the category headers are broken is still there. Also, is there a way to extend the word limit for the tags section? As my review tags are typically barely under the word limit, I don't think I am able to add the favourite tags. Thanks! |
| Cosplayer, Photographer, & Journalist. ========= Discord► Yoshe#7068 Instagram► yoshe_plays Other Social Media Links► YoshePlays |
Jun 21, 2020 2:04 AM
#476
| @YoshePlays I'll remove the banner and re-add the mod to the main post within a day or two, I just have some more important things going on first. Unfortunately, there's no way to extend the tag limit. Your best alternative option would be to use some CSS to add reviews to each item, but that is more annoying to maintain (and is not exported if you use MAL's list export function, unlike tags, which *are* exported). Would end up looking something like this for each review, and you would have to copy-paste this sort of template for each review/comment. .tags-7367::before {
content: "Mini-review would go here\a \a You would have to use some specific formatting for line-breaks and \"quotes\", but not overall too crazy."
}I could make a functional concept when I have more time if you were interested. |
Jun 21, 2020 3:21 AM
#477
Valerio_Lyndon said: .tags-7367::before {
content: "Mini-review would go here\a \a You would have to use some specific formatting for line-breaks and \"quotes\", but not overall too crazy."
}I guess I'll try this out for the series in which I would like to display the favourite hearts icon for the time being, thanks! |
YoshePlaysJun 21, 2020 3:33 AM
| Cosplayer, Photographer, & Journalist. ========= Discord► Yoshe#7068 Instagram► yoshe_plays Other Social Media Links► YoshePlays |
Jul 2, 2020 12:31 AM
#478
Thanks for the layout. I have a problem with tags even after typing in the code. The width of the tags has not increased, and they are getting separated by commas turning out like this:  The code that I have is: .data.tags { width: 240px; } .data.tags div:not(:empty){padding:2px 8px;background:var(--btn-bg);border-radius:8.5px}.data.tags span{display:inline;font-size:11px!important;cursor:text}.data.tags a:not(.edit){display:inline;padding:0;background:0 0;pointer-events:none} So, what should I do to make the tag wider and have all the text in a single paragraph? |
Jul 2, 2020 12:48 PM
#479
epraveen said: I have a problem with tags even after typing in the code. The width of the tags has not increased, and they are getting separated by commas turning out like this: https://i.imgur.com/V4Biyrk.png This is due to a missing bracket prior to the tag code. The missing closing bracket "}" causes breakage to everything below it, due to the CSS processing things incorrectly when it isn't there. To fix this, simply add a closing bracket to the end of line 43 or on line 44. You can see me doing this in the GIF below:  |
Jul 2, 2020 4:10 PM
#480
| @Valerio_Lyndon Thanks for the help, it worked like a charm. |
Jul 7, 2020 6:48 AM
#481

| Thanks for this great theme! I wonder if it's possible to change the scores to titles through CSS like a 6 should change to an "Above average". |
 |
Jul 7, 2020 10:50 PM
#482
CypherNL said: Thanks for this great theme! I wonder if it's possible to change the scores to titles through CSS like a 6 should change to an "Above average". Definitely possible. :) Here's some code that does that. Feel free to tweak it a bit to change up the phrases and the like. Add to the bottom of your CSS. /*-S-T-A-R-T--------------------*\
| Rename Scores |
\*------------------------------*/
.data.score {
width: 120px; /* Width of score section. Increase or decrease as needed */
}
/* Change score texts here */
.data.score .score-na::after {
content: "Unrated";
} .data.score .score-1::after {
content: "Horrible";
} .data.score .score-2::after {
content: "Very Bad";
} .data.score .score-3::after {
content: "Bad";
} .data.score .score-4::after {
content: "Below Average";
} .data.score .score-5::after {
content: "Average";
} .data.score .score-6::after {
content: "Above Average";
} .data.score .score-7::after {
content: "Good";
} .data.score .score-8::after {
content: "Very Good";
} .data.score .score-9::after {
content: "Great";
} .data.score .score-10::after {
content: "Masterpiece";
}
/* Various Styling */
.data.score a {
display: inline-flex;
width: auto;
height: auto;
min-width: 14px;
max-width: 100%;
min-height: 14px;
padding: 6px;
justify-content: center;
align-items: center;
overflow-wrap: break-word;
}
.data.score span {
font-size: 0;
line-height: 1;
max-width: 100%;
}
.data.score span::after {
font-size: 12px;
}
/*------------------------E-N-D-*/ |
Jul 8, 2020 6:02 AM
#483
Valerio_Lyndon said: CypherNL said: Thanks for this great theme! I wonder if it's possible to change the scores to titles through CSS like a 6 should change to an "Above average". Definitely possible. :) Here's some code that does that. Feel free to tweak it a bit to change up the phrases and the like. Add to the bottom of your CSS. /*-S-T-A-R-T--------------------*\
| Rename Scores |
\*------------------------------*/
.data.score {
width: 120px; /* Width of score section. Increase or decrease as needed */
}
/* Change score texts here */
.data.score .score-na::after {
content: "Unrated";
} .data.score .score-1::after {
content: "Horrible";
} .data.score .score-2::after {
content: "Very Bad";
} .data.score .score-3::after {
content: "Bad";
} .data.score .score-4::after {
content: "Below Average";
} .data.score .score-5::after {
content: "Average";
} .data.score .score-6::after {
content: "Above Average";
} .data.score .score-7::after {
content: "Good";
} .data.score .score-8::after {
content: "Very Good";
} .data.score .score-9::after {
content: "Great";
} .data.score .score-10::after {
content: "Masterpiece";
}
/* Various Styling */
.data.score a {
display: inline-flex;
width: auto;
height: auto;
min-width: 14px;
max-width: 100%;
min-height: 14px;
padding: 6px;
justify-content: center;
align-items: center;
overflow-wrap: break-word;
}
.data.score span {
font-size: 0;
line-height: 1;
max-width: 100%;
}
.data.score span::after {
font-size: 12px;
}
/*------------------------E-N-D-*/Just what i wanted! Thanks! The only thing i would change (if i figure it out) is to center the score selection when you click on the score since it now jumps to right when it appears. |
|
Jul 8, 2020 9:48 PM
#484
CypherNL said: Just what i wanted! Thanks! The only thing i would change (if i figure it out) is to center the score selection when you click on the score since it now jumps to right when it appears. Ah yes, you can just add this CSS somewhere within the previous code or to the bottom of all of your CSS. It should centre the selection box. .data.score {
display: flex !important;
justify-content: center;
align-items: center;
}
.data.score a {
margin: auto;
}
.data.score select {
position: static;
} .data.score .link:not([style*="none"]) + select {
display: none;
} |
Jul 9, 2020 12:01 AM
#485
Valerio_Lyndon said: CypherNL said: Just what i wanted! Thanks! The only thing i would change (if i figure it out) is to center the score selection when you click on the score since it now jumps to right when it appears. Ah yes, you can just add this CSS somewhere within the previous code or to the bottom of all of your CSS. It should centre the selection box. It's perfect now! Thank you very much! |
|
Jul 14, 2020 12:04 AM
#486
| This layout is fantastic. Thanks a lot! |
Jul 26, 2020 3:26 PM
#487

 (my codes if needed) @import "https://valeriolyndon.github.io/MAL-Public-List-Designs/Clarity%20Theme/Theme%20-%20Compressed.css"; @import "https://valeriolyndon.github.io/MAL-Public-List-Designs/Clarity%20Theme/Mod%20-%20Dark%20Mode%20Compressed.css"; .data.tags { width: 170px; } .data.tags div:not(:empty){padding:2px 8px;background:var(--btn-bg);border-radius:8.5px}.data.tags span{display:inline;font-size:11px!important;cursor:text}.data.tags a:not(.edit){display:inline;padding:0;background:0 0;pointer-events:none} status-menu .status-button{transition:color .3s ease}.status-menu .status-button.on:nth-of-type(1),.status-menu .status-button:nth-of-type(1):hover{color:var(--accent)!important}.status-menu .status-button.on:nth-of-type(2),.status-menu .status-button:nth-of-type(2):hover{color:var(--watching)!important}.status-menu .status-button.on:nth-of-type(3),.status-menu .status-button:nth-of-type(3):hover{color:var(--completed)!important}.status-menu .status-button.on:nth-of-type(4),.status-menu .status-button:nth-of-type(4):hover{color:var(--onhold)!important}.status-menu .status-button.on:nth-of-type(5),.status-menu .status-button:nth-of-type(5):hover{color:var(--dropped)!important}.status-menu .status-button.on:nth-of-type(6),.status-menu .status-button:nth-of-type(6):hover{color:var(--plantowatch)!important} body { --avatar: url(https://i.imgur.com/vSAyZJ7.gif); } body { --name: "a "; } body { --banner: url(https://i.imgur.com/TOTRE6P.jpg); } body { --character: none; } footer:before, footer:after { content: ""; position: fixed; top: 0; z-index: -1; width: calc(50% - 670px); min-width: 200px; height: 100%; background: transparent no-repeat center bottom / contain scroll; } footer:before { right: calc(100% - (50% - 670px)); background-image: url(https://i.imgur.com/rrwNbWf.png); background-position: left bottom; |
Arashi_SagaraJul 26, 2020 3:39 PM
All those memories will be lost in time, like tears in rain..  |
Jul 26, 2020 6:24 PM
#488

| Hello, I am not sure if you're still active or still respond but thanks if you do respond. So basically I'm having an issue where the tags are not appearing. i copy-pasted the one in the guide but it's not appearing in my list. /*-S-T-A-R-T--------------------*\
| Horizontal Tags R0.2 |
\*------------------------------*/
.list-table-data{padding-bottom:11px}.data.tags{position:absolute;left:0;top:0;display:flex!important;width:0;height:100%;padding:0!important;align-items:flex-end}.data.tags div{max-width:980px;margin:0 0 4px 80px;font-size:0;white-space:nowrap}.data.tags span{display:inline-block;padding:0}.data.tags span a{padding:1px 8px!important;margin:0 4px 0 0;white-space:nowrap}.data.tags span a[href*="=Favo"]{padding:0!important}.data.tags a.edit{right:-1060px}.data.tags textarea{right:-1060px}
/*------------------------E-N-D-*/
Is there suppose to be a specific way I should write my tags (Like tag1, tag2, etc) or is there some @\import code I need to add. Also, I do have a suggestion, I'm not sure if this has been said before or not. I was wondering if there is anyway to have this (https://imgur.com/fIwoMFT) stay alongisde the header when you scroll down or even in a side navigation bar. |
 |
Jul 27, 2020 12:27 AM
#489
vousvoyez said: I'm having an issue where the tags are not appearing. i copy-pasted the one in the guide but it's not appearing in my list. Also, I do have a suggestion, I'm not sure if this has been said before or not. I was wondering if there is anyway to have this (https://imgur.com/fIwoMFT) stay alongisde the header when you scroll down or even in a side navigation bar. Looks like you figured out the tags issue? :) It's possible to have the buttons follow the page using some more recent CSS tech, although I have not extensively tested that it has no visual issues. Add any of these snippets that you want. /* Affix left side menu buttons */
.list-menu-float {
position: -webkit-sticky;
position: sticky;
top: 0;
}/* Affix right side menu buttons */
.list-unit .list-status-title {
position: absolute;
top: 446px;
left: calc(50% - 530px);
height: calc(100% - 446px) !important;
pointer-events: none;
}
.list-unit .list-status-title .stats {
position: -webkit-sticky;
position: sticky;
top: 74px;
z-index: 38;
margin: 10px 32px 0;
float: right;
pointer-events: auto;
}
.list-table > tbody:first-of-type {
position: absolute;
top: 422px;
left: calc(50% + 500px);
height: calc(100% - 420px);
pointer-events: none;
}
.list-table > tbody:first-of-type::after,
.list-table-header {
position: -webkit-sticky;
position: sticky;
top: 74px;
pointer-events: auto;
}
.list-table > tbody:first-of-type::after {
margin-top: -26px;
}
.list-table-header {
display: flex;
margin-right: 15px;
padding: 0;
justify-content: right;
}Included this in case you prefer how it looks. Since there is no way to reposition the button into a more natural position, this is the next best solution. /* Prevent avatar resize */
.fixed .status-menu {
padding: 0 0 0 173px;
}
.fixed .status-menu::after {
top: -51px;
width: 150px;
height: 150px;
box-shadow: 0 1px 2px var(--shadow);
} |
Jul 27, 2020 12:30 AM
#490
Valerio_Lyndon said: vousvoyez said: I'm having an issue where the tags are not appearing. i copy-pasted the one in the guide but it's not appearing in my list. Also, I do have a suggestion, I'm not sure if this has been said before or not. I was wondering if there is anyway to have this (https://imgur.com/fIwoMFT) stay alongisde the header when you scroll down or even in a side navigation bar. Looks like you figured out the tags issue? :) }[/code][/spoiler] It was just a dumb mistake on my part, I forgot to enable it in setting, but it was now solved. Thanks for the code, will try them out. |
|
Jul 27, 2020 12:44 AM
#491
| @xasifzzz First things first, I need you to add a closing curly brace "}" on line 28. Same as I do here: 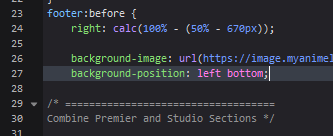 If this is not done, the rest of this post will probably do nothing, as the code won't recognize anything beyond that missing curly brace. Also, make sure to add all new code to the bottom of your CSS. xasifzzz said: 1. how to change the color of the floating text on the banner? Add this, then change the two "#COLOUR" texts to any valid CSS colour. /* Change banner text colouration */
#cover-image-container::after {
color: #COLOUR ;
text-shadow: 2px 2px 8px #COLOUR ;
}xasifzzz said: 12. code for changing the character position from right to left (on the banner). /* Reposition character image */
#list-container #cover-image-container {
/* Position is <horizontal> <vertical>.
* Values such as left/right/top are accepted,
* as well as pixel "350px", and percent "60%" values
*/
background-position: left center;
}xasifzzz said: 13. code for changing the color of scores (10 different colors) if possible The "#COLOUR" texts represent where colours can be input. You can tell what it will affect by the ".score-#" on the same line. /* Recolour scores */
.score-10 { color: #COLOUR ; }
.score-9 { color: #COLOUR ; }
.score-8 { color: #COLOUR ; }
.score-7 { color: #COLOUR ; }
.score-6 { color: #COLOUR ; }
.score-5 { color: #COLOUR ; }
.score-4 { color: #COLOUR ; }
.score-3 { color: #COLOUR ; }
.score-2 { color: #COLOUR ; }
.score-1 { color: #COLOUR ; }
.score-na { color: #COLOUR ; }To add large cover images, you can use the Large Covers mod from the main forum post: Valerio_Lyndon said: 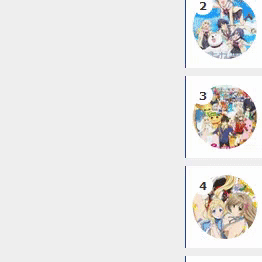 Adds larger anime/manga cover previews to your list. Does not normally work on privated lists. For help and solutions with covers not working and private lists, see "Cover images aren't loading?" under the "FAQ & Help" section. Adds larger anime/manga cover previews to your list. Does not normally work on privated lists. For help and solutions with covers not working and private lists, see "Cover images aren't loading?" under the "FAQ & Help" section.Choose a version: This version appears when hovering over any part of a list row. Insert this section to the top of your CSS. It must precede anything that isn't another "@import" statement. See spoiler below for an example. 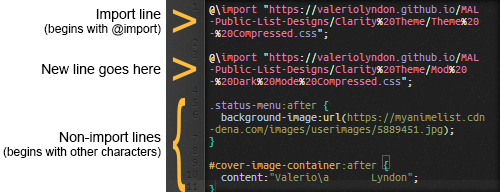 @\import "https://malscraper.azurewebsites.net/covers/auto/presets/dataimagelinkbefore"; @\import "https://valeriolyndon.github.io/MAL-Public-List-Designs/Clarity%20Theme/Mod%20-%20Hover%20Image%20Compressed.css"; If the above method does not work or you do not want automatic updates, you can install the CSS directly. This is meant as an alternative to the above install, please do not use both methods at the same time. First, add this section to the top of your list code, preceding everything that isn't another "@import" statement. @\import "https://malscraper.azurewebsites.net/covers/auto/presets/dataimagelinkbefore"; Next, put the entire code block from this link at the bottom of your CSS. Source Code And you're done! :) This version appears when hovering over the small preview image. Don't add both versions, choose only one. Insert this section to the top of your CSS. It must precede anything that isn't another "@import" statement. See spoiler below for an example. @\import "https://malscraper.azurewebsites.net/covers/auto/presets/dataimagelinkbefore"; @\import "https://valeriolyndon.github.io/MAL-Public-List-Designs/Clarity%20Theme/Mod%20-%20Hover%20Image%20On%20Circle%20Compressed.css"; If the above method does not work or you do not want automatic updates, you can install the CSS directly. This is meant as an alternative to the above install, please do not use both methods at the same time. First, add this section to the top of your list code, preceding everything that isn't another "@import" statement. @\import "https://malscraper.azurewebsites.net/covers/auto/presets/dataimagelinkbefore"; Next, put the entire code block from this link at the bottom of your CSS. Source Code |
Jul 27, 2020 12:56 AM
#492


Jul 27, 2020 1:10 AM
#493
DimitrovN said: Hey there, first of all I wanna say I really enjoy your work! But i have a question about the header text, is there anyway I could change the font and reposition it? You can definitely do that. Instead of giving you a special code for each thing though, I figured I'd just give you a commentated version of the code relating to the header text. From here you can customize it as much as you want. /* Banner text codes */
#cover-image-container::after {
/* Top positioning */
top: 55px;
/* Positions the element to always be positioned in relation to the centre of the banner */
left: 50%;
/* Additional left positioning, to visually position the text where I want it.
* I recommend changing this value instead of the one above */
margin-left: -475px;
/* Transforms the text to give it a slanted appearance */
transform: scale(.9) perspective(350px) rotateY(8deg) rotateZ(-3deg);
/* Text colour */
color: #fff;
/* Text shadow */
text-shadow: 1px 4px 7px rgba(0,0,0,.45);
/* Sets the font style (bold), size/line height (60px/60px), & font family (Oswald) */
font: bold 60px/60px Oswald;
/* Adds spacing between letters */
letter-spacing: 15px;
/* Forces text into uppercase. Change to "initial" to reset. */
text-transform: uppercase;
}Hopefully it all makes some modicum of sense in this fashion. To change the font from Oswald, you could change the text to read "Arial", for instance. Do be aware though that many custom fonts will not be visible to other people unless you add an @import statement at the top of your CSS which will download that font for visitors of your list. For help with adding a font from Google Fonts or your PC, I'd check Shishio's video on the topic. I recommend the sections at 0:10 or 7:27. [Link]. |
Jul 27, 2020 1:15 AM
#494
Jul 27, 2020 2:05 AM
#495
| Ok, so I can't really figure it out yet... 1. Is there a simple way to put the text centred both horizontally and vertically, where it does not matter what size your screen is? Cuz when it's centred on my laptop, its completely out of the center on my Chromebook. 2. Is there a way to get rid of the animation of the text coming in? I appreciate the help. |
Jul 27, 2020 2:48 AM
#496
DimitrovN said: Ok, so I can't really figure it out yet... 1. Is there a simple way to put the text centred both horizontally and vertically, where it does not matter what size your screen is? Cuz when it's centred on my laptop, its completely out of the center on my Chromebook. 2. Is there a way to get rid of the animation of the text coming in? I appreciate the help. Mm, I see. The easiest way to centre it would probably be adding onto the transform. I can go into why this is if you're curious. This code also removes the animation. Add below the prior code, or if you feel comfortable doing so, you can integrate the new code into the old by deleting the duplicate properties (for ex. "top") and replacing it with the new values. /* Banner Text Centring Overrides */
#cover-image-container::after {
/* center text in relation to layout */
top: 50%;
left: 50%;
margin: 0;
transform: scale(0.9) translate(-50%,-50%);
/* remove animation */
animation: none;
/* center text in relation to itself */
text-align: center;
white-space: normal;
} |
Jul 28, 2020 9:08 AM
#497
@import "https://valeriolyndon.github.io/MAL-Public-List-Designs/Clarity%20Theme/Theme%20-%20Compressed.css"; @import "https://valeriolyndon.github.io/MAL-Public-List-Designs/Clarity%20Theme/Mod%20-%20Dark%20Mode%20Compressed.css"; @import "https://malscraper.azurewebsites.net/covers/auto/presets/dataimagelinkbefore"; @import "https://valeriolyndon.github.io/MAL-Public-List-Designs/Clarity%20Theme/Mod%20-%20Hover%20Image%20Compressed.css"; body { --avatar: url(https://i.imgur.com/pkEExVA.png); } body { --banner: url(https://i.imgur.com/XqH2zhY.jpg); } /* Change banner text & COLOR */ body { --name: "Unravela the world!"; } /* banner text color */ #cover-image-container::after { color: #141414 ; text-shadow: 2px 2px 8px #565656 ; } body { --character: none; } /* Reposition character image */ #list-container #cover-image-container { /* Position is . * Values such as left/right/top are accepted, * as well as pixel "350px", and percent "60%" values */ background-position: left center; } /*-S-T-A-R-T--------------------* | CatCol Header Text R0.0 | *------------------------------*/ .status-menu .status-button{transition:color .3s ease}.status-menu .status-button.on:nth-of-type(1),.status-menu .status-button:nth-of-type(1):hover{color:var(--accent)!important}.status-menu .status-button.on:nth-of-type(2),.status-menu .status-button:nth-of-type(2):hover{color:var(--watching)!important}.status-menu .status-button.on:nth-of-type(3),.status-menu .status-button:nth-of-type(3):hover{color:var(--completed)!important}.status-menu .status-button.on:nth-of-type(4),.status-menu .status-button:nth-of-type(4):hover{color:var(--onhold)!important}.status-menu .status-button.on:nth-of-type(5),.status-menu .status-button:nth-of-type(5):hover{color:var(--dropped)!important}.status-menu .status-button.on:nth-of-type(6),.status-menu .status-button:nth-of-type(6):hover{color:var(--plantowatch)!important} /*------------------------E-N-D-*/ /*-S-T-A-R-T--------------------* | Review Tags R0.1 | *------------------------------*/ /* Raise or lower this number to change how wide the box is. Make sure not to remove the "px" at the end. */ .data.tags { width: 170px; } .data.tags div:not(:empty){padding:2px 8px;background:var(--btn-bg);border-radius:8.5px}.data.tags span{display:inline;font-size:11px!important;cursor:text}.data.tags a:not(.edit){display:inline;padding:0;background:0 0;pointer-events:none} /*-S-T-A-R-T--------------------* | Theme Colours | *------------------------------*/ :root { /* Button Colours */ --bg-dark: #1C1C1C; --btn-head-bg-h: #323232; --btn-text-h: #fff; /* Status Colours */ --accent: #FFFFFF; --watching: #32CD32; --completed: #9400D3; --onhold: #E9E900; --dropped: #D90000; --plantowatch: #1E90FF; /* Single-Use Colours */ --edit-btn: #d9d9d9; --checkmark: #F6F6F6; } /*------------------------E-N-D-*/ /*-S-T-A-R-T--------------------* | List Character Renders R0.3 | *------------------------------*/ footer:before, footer:after { content: ""; position: fixed; top: 0; z-index: -1; width: calc(50% - 670px); min-width: 200px; height: 100%; background: transparent no-repeat center bottom / contain scroll; } footer:before { right: calc(100% - (50% - 670px)); background-image: url(https://i.imgur.com/rrwNbWf.png); background-position: left bottom; } /* =================================== Combine Premier and Studio Sections */ .data.season { width: 120px; height: 32px; margin-top: 8px; -webkit-align-self: flex-start; -moz-align-self: flex-start; align-self: flex-start; } .data.studio { margin-top: 45px !important; margin-left: -120px; -webkit-order: 20; -moz-order: 20; order: 20; } /* ReColour scores */ .score-10 { color: #FFD700 ; } .score-9 { color: #9400D3 ; } .score-8 { color: #0076FF ; } .score-7 { color: #00BF00 ; } .score-6 { color: #FFFFFF ; } .score-5 { color: #FFFFFF ; } .score-4 { color: #FF7C00 ; } .score-3 { color: #FF0000 ; } .score-2 { color: #FF0000 ; } .score-1 { color: #FF0000 ; } .score-na { color: #COLOUR ; } /*==============================* | Score Descriptors | * --- - --- - ---- - --- - --- */ .score-na::before { content: "Haven't decided"; } .score-1::before { content: "Unredeemable"; } .score-2::before { content: "Horrid"; } .score-3::before { content: "Awful"; } .score-4::before { content: "Bad"; } .score-5::before { content: "Mediocre"; } .score-6::before { content: "Fine"; } .score-7::before { content: "Good"; } .score-8::before { content: "Great"; } .score-9::before { content: "Fantastic"; } .score-10::before { content: "Incredible"; } /* Internals */ .score-label { position: relative; display: inline-block; z-index: 0; transition: color 0.2s ease; } .score-label:hover { color: #fff !important; } .score-label::before { position: absolute; top: -4px; left: -8px; z-index: -1; display: block; padding: 4px 8px 4px calc(100% + 12px); background: #111; border-radius: 4px; opacity: 0; transition: opacity 0.2s ease; white-space: pre; text-align: left; pointer-events: none; } .score-label:hover::before { opacity: 1; } /****************************/ /* font resize on Hover */ /****************************/ .list-table-data:hover td { font-size: 12px !Important; -moz-transition: .4s ease; -webkit-transition: .4.5s ease; -o-transition: .4s ease; } /*-S-T-A-R-T--------------------* | Header Outline (CatCol) R0.0 | *------------------------------*/ [data-query*='status":7']{--header-border:var(--accent)}[data-query*='status":1']{--header-border:var(--watching)}[data-query*='status":2']{--header-border:var(--completed)}[data-query*='status":3']{--header-border:var(--onhold)}[data-query*='status":4']{--header-border:var(--dropped)}[data-query*='status":6']{--header-border:var(--plantowatch)}.status-menu-container:before{height:56px;border-width:4px 0;border-style:solid;border-color:var(--header-border)}.status-menu:after{left:-4px;top:-47px;border-width:4px;box-shadow:0 0 0 4px var(--header-border)}.fixed .status-menu:after{top:4px} /*------------------------E-N-D-*/ /*-S-T-A-R-T--------------------* | Hover Image R0.3 | *------------------------------*/ .data.image a{overflow:visible}.data.image a:before{content:"";position:absolute;top:50%;left:-166px;z-index:50;width:150px;height:0;background:var(--bg-dark) no-repeat center/cover;border-radius:8px;box-shadow:0 0 2px #000;opacity:0;pointer-events:none;transition:all .3s ease}.list-item:hover .data.image a:before{top:calc(50% - 100px);height:200px;opacity:1}.data.image a:after,.data.image img{border-radius:50%} /*------------------------E-N-D-*/ and most importantly THANK YOU SO MUCH for all the help. |
Arashi_SagaraJul 28, 2020 9:19 AM
All those memories will be lost in time, like tears in rain.. |
Jul 29, 2020 12:44 AM
#498
To simply move it left like that, you can add this and then decrease the "50%". Perhaps 20% might be about where you want? Negative numbers will work too, such as -10%. /* Banner Text Position */
#cover-image-container::after {
left: 50% ;
}xasifzzz said: 2. changing the position of the avatar (left to middle) & resizing /* ==========================
Reposition & Resize Avatar */
/* Change avatar size here */
:root { --avatar-size: 150px ; }
.status-menu {
display: flex !important;
height: 64px;
padding: 0 82px 0 0 !important;
justify-content: center;
}
.status-menu .status-button {
flex: 0 0 auto;
margin: 0 !important;
}
.status-button:nth-of-type(1) {
width: 110px;
order: 1;
} .status-button:nth-of-type(2) {
width: 197px;
order: 2;
} .status-button:nth-of-type(3) {
width: 116px;
order: 3;
} .status-button:nth-of-type(4) {
width: 95px;
order: 7;
} .status-button:nth-of-type(5) {
width: 98px;
order: 8;
} .status-button:nth-of-type(6) {
width: 148px;
order: 9;
}
.status-menu-container .status-menu .status-button::after {
left: 15px;
width: calc(100% - 30px);
}
.status-menu::after {
position: relative;
top: calc((var(--avatar-size) + 8px) * -0.5 + 32px);
left: 0;
z-index: 1;
width: var(--avatar-size);
height: var(--avatar-size);
display: block;
order: 5;
flex: 0 0 auto;
}
.status-menu-container .search-container {
z-index: 1;
}
.list-menu-float {
width: 1060px;
padding: 0;
}
.header .header-title {
margin-left: 0;
}
.btn-menu a.username {
left: calc(50% - (var(--avatar-size) * 0.5));
top: calc((var(--avatar-size) + 8px) * -0.5 + 72px);
width: var(--avatar-size);
height: var(--avatar-size);
}xasifzzz said: 3. only one part of the header line colored. like: lower or higher part of the border / only the circle of avatar  To apply a new colour on all categories, use this, replacing #COLOUR with any CSS colour. To apply a new colour on all categories, use this, replacing #COLOUR with any CSS colour./* =============================
Header Outline Custom Colours */
/* Top */
.status-menu-container:before { border-top-color: #COLOUR }
/* Bottom */
.status-menu-container:before { border-bottom-color: #COLOUR }
/* Avatar */
.status-menu::after { box-shadow:0 0 0 4px #COLOUR }To apply a new colour per category, use this. /* =============================
Header Outline Custom Colours */
[data-query*='status":7'] {
/* All Anime */
--header-border-top: #COLOUR ;
--header-border-bottom: #COLOUR ;
--header-border-avatar: #COLOUR ;
} [data-query*='status":1'] {
/* Watching */
--header-border-top: #COLOUR ;
--header-border-bottom: #COLOUR ;
--header-border-avatar: #COLOUR ;
} [data-query*='status":2'] {
/* Completed */
--header-border-top: #COLOUR ;
--header-border-bottom: #COLOUR ;
--header-border-avatar: #COLOUR ;
} [data-query*='status":3'] {
/* On Hold */
--header-border-top: #COLOUR ;
--header-border-bottom: #COLOUR ;
--header-border-avatar: #COLOUR ;
} [data-query*='status":4'] {
/* Dropped */
--header-border-top: #COLOUR ;
--header-border-bottom: #COLOUR ;
--header-border-avatar: #COLOUR ;
} [data-query*='status":6'] {
/* Plan to Watch */
--header-border-top: #COLOUR ;
--header-border-bottom: #COLOUR ;
--header-border-avatar: #COLOUR ;
}
/* Internal Fix */
.status-menu-container:before {
border-top-color: var(--header-border-top);
border-bottom-color: var(--header-border-bottom);
}
.status-menu::after {
box-shadow:0 0 0 4px var(--header-border-avatar);
} |
Jul 29, 2020 6:20 AM
#499
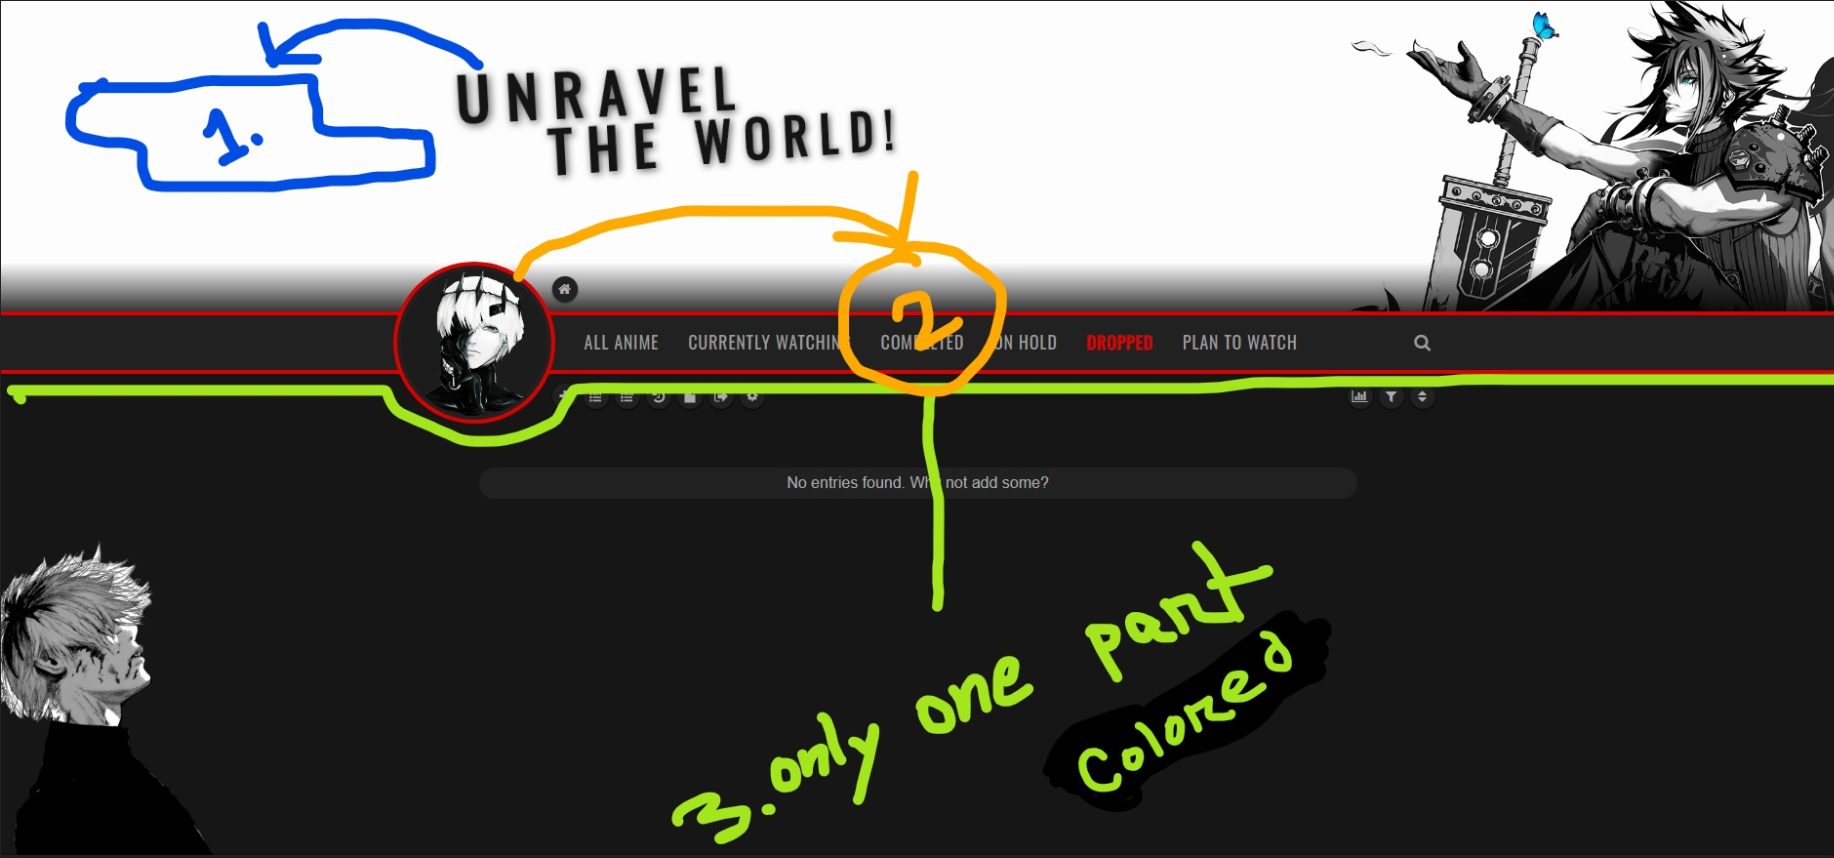
| thanks again for your reply. the problem is the link to my profile did not move with the avatar, if I click on "ALL ANIME" it goes to my profile  and codes for changing status menu button names (all anime, watching...) @\import "https://valeriolyndon.github.io/MAL-Public-List-Designs/Clarity%20Theme/Theme%20-%20Compressed.css"; @\import "https://valeriolyndon.github.io/MAL-Public-List-Designs/Clarity%20Theme/Mod%20-%20Dark%20Mode%20Compressed.css"; @\import "https://malscraper.azurewebsites.net/covers/auto/presets/dataimagelinkbefore"; @\import "https://valeriolyndon.github.io/MAL-Public-List-Designs/Clarity%20Theme/Mod%20-%20Hover%20Image%20Compressed.css"; body { --background: url(URLHERE); } body { --avatar: url(https://i.imgur.com/pkEExVA.png); } body { --banner: url(https://i.imgur.com/XqH2zhY.jpg); } /* Change banner text & COLOR */ body { --name: "Unravel\a the world!"; } /* banner text color */ #cover-image-container::after { color: #141414 ; text-shadow: 2px 2px 8px #565656 ; } /* Banner Text Position */ #cover-image-container::after { left: 30% ; } body { --character: none; } /* Reposition character image */ #list-container #cover-image-container { /* Position is . * Values such as left/right/top are accepted, * as well as pixel "350px", and percent "60%" values */ background-position: left center; } /*-S-T-A-R-T--------------------*\ | List Character Renders R0.3 | \*------------------------------*/ footer:before, footer:after { content: ""; position: fixed; top: 0; z-index: -1; width: calc(50% - 670px); min-width: 200px; height: 100%; background: transparent no-repeat center bottom / contain scroll; } /* Left Render */ footer:before { right: calc(100% - (50% - 670px)); background-image: url(https://i.imgur.com/rrwNbWf.png); background-position: left bottom; } /* Right Render */ footer:after { left: calc(100% - (50% - 670px)); background-image: url(none); background-position: right bottom; } /*-S-T-A-R-T--------------------*\ | CatCol Header Text R0.0 | \*------------------------------*/ .status-menu .status-button{transition:color .3s ease}.status-menu .status-button.on:nth-of-type(1),.status-menu .status-button:nth-of-type(1):hover{color:var(--accent)!important}.status-menu .status-button.on:nth-of-type(2),.status-menu .status-button:nth-of-type(2):hover{color:var(--watching)!important}.status-menu .status-button.on:nth-of-type(3),.status-menu .status-button:nth-of-type(3):hover{color:var(--completed)!important}.status-menu .status-button.on:nth-of-type(4),.status-menu .status-button:nth-of-type(4):hover{color:var(--onhold)!important}.status-menu .status-button.on:nth-of-type(5),.status-menu .status-button:nth-of-type(5):hover{color:var(--dropped)!important}.status-menu .status-button.on:nth-of-type(6),.status-menu .status-button:nth-of-type(6):hover{color:var(--plantowatch)!important} /*------------------------E-N-D-*/ /*-S-T-A-R-T--------------------*\ | Review Tags R0.1 | \*------------------------------*/ /* Raise or lower this number to change how wide the box is. Make sure not to remove the "px" at the end. */ .data.tags { width: 170px; } .data.tags div:not(:empty){padding:2px 8px;background:var(--btn-bg);border-radius:8.5px}.data.tags span{display:inline;font-size:11px!important;cursor:text}.data.tags a:not(.edit){display:inline;padding:0;background:0 0;pointer-events:none} /*-S-T-A-R-T--------------------*\ | Theme Colours | \*------------------------------*/ :root { /* Button Colours */ --bg-dark: #1C1C1C; --btn-head-bg-h: #323232; --btn-text-h: #fff; /* Status Colours */ --accent: #FFFFFF; --watching: #32CD32; --completed: #9400D3; --onhold: #E9E900; --dropped: #D90000; --plantowatch: #1E90FF; /* Single-Use Colours */ --edit-btn: #d9d9d9; --checkmark: #F6F6F6; } /*------------------------E-N-D-*/ /* =================================== Combine Premier and Studio Sections */ .data.season { width: 120px; height: 32px; margin-top: 8px; -webkit-align-self: flex-start; -moz-align-self: flex-start; align-self: flex-start; } .data.studio { margin-top: 45px !important; margin-left: -120px; -webkit-order: 20; -moz-order: 20; order: 20; } /* ReColour scores */ .score-10 { color: #FFD700 ; } .score-9 { color: #9400D3 ; } .score-8 { color: #0076FF ; } .score-7 { color: #00BF00 ; } .score-6 { color: #FFFFFF ; } .score-5 { color: #FFFFFF ; } .score-4 { color: #FF7C00 ; } .score-3 { color: #FF0000 ; } .score-2 { color: #FF0000 ; } .score-1 { color: #FF0000 ; } .score-na { color: #COLOUR ; } /*==============================*\ | Score Descriptors | \* --- - --- - ---- - --- - --- */ .score-na::before { content: "Haven't decided"; } .score-1::before { content: "Unredeemable"; } .score-2::before { content: "Horrid"; } .score-3::before { content: "Awful"; } .score-4::before { content: "Bad"; } .score-5::before { content: "Mediocre"; } .score-6::before { content: "Fine"; } .score-7::before { content: "Good"; } .score-8::before { content: "Great"; } .score-9::before { content: "Fantastic"; } .score-10::before { content: "Incredible"; } /* Internals */ .score-label { position: relative; display: inline-block; z-index: 0; transition: color 0.2s ease; } .score-label:hover { color: #fff !important; } .score-label::before { position: absolute; top: -4px; left: -8px; z-index: -1; display: block; padding: 4px 8px 4px calc(100% + 12px); background: #111; border-radius: 4px; opacity: 0; transition: opacity 0.2s ease; white-space: pre; text-align: left; pointer-events: none; } .score-label:hover::before { opacity: 1; } /****************************/ /* font resize on Hover */ /****************************/ .list-table-data:hover td { font-size: 12px !Important; -moz-transition: .4s ease; -webkit-transition: .4.5s ease; -o-transition: .4s ease; } /*-S-T-A-R-T--------------------*\ | Header Outline (CatCol) R0.0 | \*------------------------------*/ [data-query*='status":7']{--header-border:var(--accent)}[data-query*='status":1']{--header-border:var(--watching)}[data-query*='status":2']{--header-border:var(--completed)}[data-query*='status":3']{--header-border:var(--onhold)}[data-query*='status":4']{--header-border:var(--dropped)}[data-query*='status":6']{--header-border:var(--plantowatch)}.status-menu-container:before{height:56px;border-width:4px 0;border-style:solid;border-color:var(--header-border)}.status-menu:after{left:-4px;top:-47px;border-width:4px;box-shadow:0 0 0 4px var(--header-border)}.fixed .status-menu:after{top:4px} /*------------------------E-N-D-*/ /* ============================= Header Outline Custom Colours */ [data-query*='status":7'] { /* All Anime */ --header-border-top: # ; --header-border-bottom: # FFFFFF ; --header-border-avatar: #FFFFFF ; } [data-query*='status":1'] { /* Watching */ --header-border-top: # ; --header-border-bottom: # 32CD32 ; --header-border-avatar: #32CD32 ; } [data-query*='status":2'] { /* Completed */ --header-border-top: # ; --header-border-bottom: # 9400D3 ; --header-border-avatar: #9400D3 ; } [data-query*='status":3'] { /* On Hold */ --header-border-top: # ; --header-border-bottom: # E9E900 ; --header-border-avatar: #E9E900 ; } [data-query*='status":4'] { /* Dropped */ --header-border-top: # ; --header-border-bottom: # D90000 ; --header-border-avatar: #D90000 ; } [data-query*='status":6'] { /* Plan to Watch */ --header-border-top: # ; --header-border-bottom: # 1E90FF ; --header-border-avatar: #1E90FF ; } /* Internal Fix */ .status-menu-container:before { border-top-color: var(--header-border-top); border-bottom-color: var(--header-border-bottom); } .status-menu::after { box-shadow:0 0 0 4px var(--header-border-avatar); } /*-S-T-A-R-T--------------------*\ | Hover Image R0.3 | \*------------------------------*/ .data.image a{overflow:visible}.data.image a:before{content:"";position:absolute;top:50%;left:-166px;z-index:50;width:150px;height:0;background:var(--bg-dark) no-repeat center/cover;border-radius:8px;box-shadow:0 0 2px #000;opacity:0;pointer-events:none;transition:all .3s ease}.list-item:hover .data.image a:before{top:calc(50% - 100px);height:200px;opacity:1}.data.image a:after,.data.image img{border-radius:50%} /*------------------------E-N-D-*/ /* ========================== Reposition & Resize Avatar */ /* Change avatar size here */ :root { --avatar-size: 200px ; } .status-menu { display: flex !important; height: 64px; padding: 0 82px 0 0 !important; justify-content: center; } .status-menu .status-button { flex: 0 0 auto; margin: 0 !important; } .status-button:nth-of-type(1) { width: 110px; order: 1; } .status-button:nth-of-type(2) { width: 197px; order: 2; } .status-button:nth-of-type(3) { width: 116px; order: 3; } .status-button:nth-of-type(4) { width: 95px; order: 7; } .status-button:nth-of-type(5) { width: 98px; order: 8; } .status-button:nth-of-type(6) { width: 148px; order: 9; } .status-menu-container .status-menu .status-button::after { left: 15px; width: calc(100% - 30px); } .status-menu::after { position: relative; top: calc((var(--avatar-size) + 8px) * -0.5 + 32px); left: 0; z-index: 1; width: var(--avatar-size); height: var(--avatar-size); display: block; order: 5; flex: 0 0 auto; } .status-menu-container .search-container { z-index: 1; } .list-menu-float { width: 1060px; padding: 0; } .header .header-title { margin-left: 0; } .btn-menu a.username { left: calc(50% - (var(--avatar-size) * 0.5)); top: calc((var(--avatar-size) + 8px) * -0.5 + 72px); width: var(--avatar-size); height: var(--avatar-size); } /* Change avatar position here */ .status-menu:after { left: -4px; top: -270px; border-width: 4px; box-shadow: 0 0 0 4px var(--header-border); } /* ------------------------E-N-D- */ |
Arashi_SagaraJul 29, 2020 11:06 AM
All those memories will be lost in time, like tears in rain.. |
Jul 30, 2020 12:00 AM
#500
xasifzzz said: the problem is the link to my profile did not move with the avatar, if I click on "ALL ANIME" it goes to my profile https://i.ibb.co/fvhd8Qz/ezgif-com-optimize.gif and codes for changing status menu button names (all anime, watching...) Ah, I forgot a selector, my mistake. Was rushing a bit, clearly. If you wish to rename the sections, the header bar will have to be reorganised a tad to keep the avatar centered. Currently, it relies on some fixed size values that would be incorrect with different text, so to account for dynamic widths, I had to use a different method of avatar repositioning. The buttons are aligned to the outside edge instead of the inside now, as seen here:  Due to the amount of changes in this case, I made a revised version of your entire code so there's less spaghetti. Just replace all of your current code with this revised version: [Code]. Hopefully this time there aren't any oversights on my part. |
More topics from this board
» theme helpthreat - Jul 5 |
5 |
by Zaryf
»»
Aug 21, 5:46 AM |
|
» [CSS] ⭐️ Customize your List Cursor + Cursor FixesShishio-kun - Mar 8, 2021 |
30 |
by Shishio-kun
»»
Jul 28, 3:17 AM |
|
» How To Have Different Banner/Cover image & Background Image For Manga & Anime ListsYasminaRegina - Jul 25 |
2 |
by YasminaRegina
»»
Jul 26, 1:02 AM |
|
Sticky: » 💚 [REPAIR STICKY] Repair/speed up layouts + Request layout fixes ( 1 2 )Shishio-kun - Nov 17, 2023 |
52 |
by LucaBalsa
»»
Jul 6, 2:02 PM |
|
» [CSS/BBCODE] ⭐️ How to view anyone's CSS or BBcodes (for lists, profiles, or clubs)!Shishio-kun - Feb 6, 2012 |
37 |
by sunnysummerday
»»
Jun 11, 7:44 PM |