New
Mar 10, 2009 10:59 PM
#1

| Assembling a Sliced MAL Forum Signature This guide will walk you through assembling a sliced MAL signature and configuring your MAL profile settings so that your signature displays correctly. This guide does not show you how to slice a new signature, and assumes you have generated all the necessary images already in the correct dimensions. There are other guides available for creating/slicing your own signatures, or you can simply ask around the club and someone can help you build one. To give you a better idea, the layout of a custom mal signature is generally a single MAL-generated signature image surrounded by other images in a grid. For example:  So, let's get started putting the pieces together! Step 1: Save the Images Most of the time in this club, your sliced images will be provided to you by someone else through a forum post. You should save each of them to a folder somewhere on your computer where you can get them easily later. That way you'll have a backup of them should you ever need to upload them again later. Step 2: Configuring the MAL Part Since we just want to use the minimum update text, we want to configure it so that MAL only produces the minimum list text for our signature, and uses our custom-sliced background image. Usually your settings will be as follows:
Step 3: Hosting the Surrounding Images The mal background part is hosted by myanimelist.net, but the surrounding images are not. It's likely that the person who provided the images to you has already uploaded them to an image sharing site, in which case you can probably use the image urls they provided. You can get the url for each image by right-clicking on it in the forum post and choosing to view the image properties. If you sliced your signature yourself, you'll have to find a place to host them online, and make note of each of their image urls. If you're new to image hosting, click the spoiler for more instructions... So, let's get these images online!.... You should have saved all the image slices to a folder somewhere on your computer already. We need to upload each of them to a public webserver so that other people on the Internet can see them. Many sites let you host images online for free, and some of the popular ones are listed below:
For each one of your images, select and upload each of the images for your sig. You'll need the "Direct" url to each image, which should be given to you after uploading each image. In TinyPic it's listed as "Direct Link for Layouts" after uploading... In ImageShack, after uploading, click to "Show Advanced Linking" at the bottom and it will give the direct link... In Photobucket, you will see the direct link by hovering over the image in your albums. As of this writing, TinyPic has a higher bandwidth limit than ImageShack for anonymous hosting. Regretfully, TinyPic only supports jpeg images so no transparency or animations will work, which is why you may need to use one of the others. If you're a Windows user, you may find it easier to use TinyPic/ImageShack Uploader (written by fellow mal user and resident diety Kotori), which lets you upload directly to TinyPic, ImageShack, or MessyShare. It has context menu support, so you can just right click the image's folder icon and upload more conveniently. Step 4: Putting It All Together in BBCode: If you've been around forums at all you'll recognize bbcode, but you'll get used to it quickly if you are new to the concept. You basically write special markers (tags) into your text that are interpreted by the forum to change how the text is displayed, or to insert special objects like images. The tags we'll be using to construct a signature are mainly the [img] and [url] tags. You can learn more about the bbcode supported by mal here. The basic code template for a sliced mal signature: [url=http://myanimelist.net/animelist/USERNAME&sclick=1][img]http://yourimagehost/top.png[/img] [img]http://yourimagehost/left.png[/img][img]http://myanimelist.net/signature/USERNAME.png[/img][img]http://yourimagehost/right.png[/img] [img]http://yourimagehost/bottom.png[/img][/url] Sometimes, there will be fewer images if the mal part is along an edge, so you may not need all of the pieces. For example, if the MAL part fits along the bottom right corner, there would be no need to have right or bottom images. Ask the creator of the signature if you need help formatting it properly.  Important Note about newlines about your bbcode: The location of the return characters (Enter key on your keyboard) does affect how the signature is displayed. Stray returns or spaces in your signature code will make spaces between images. For best results, there should be no spaces anywhere in your code except a single return after each row of images except the last.... so... [img]...top[/img]return If the returns are omitted there, Internet Explorer does not wrap them properly, expanding the forum in a nasty way -- so make sure you put them in! The returns are already in the bbcode template earlier in this tutorial, so you can safely copy/paste that one to use as a starting point. Browsers other than Internet Explorer do not have this wrapping problem.[img]left[/img][img]malpart[/img][img]right[/img]return [img]bottom[/img] |

sakaMay 16, 2009 4:33 PM
 I am a banana. |
Mar 11, 2009 12:47 AM
#2

| Amazing tutorial. Now i dont have to explain it to people i make a sig for =] |
Mar 11, 2009 4:25 PM
#3

Sugoi-otaku said: Amazing tutorial. Now i dont have to explain it to people i make a sig for =] |
     |
Mar 14, 2009 10:03 PM
#4


-DraGonZ-Mar 14, 2009 10:13 PM
Mar 14, 2009 10:16 PM
#5
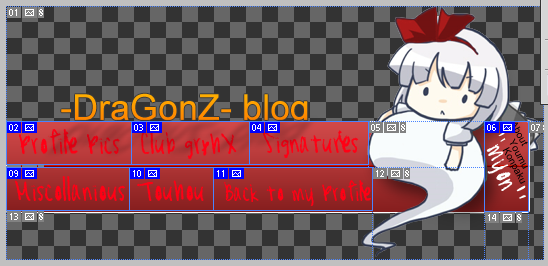
saka said: You have to make sure that all of your images, when put in rows, do not lie in multiple rows. so when you want to have a linked word on a picture, make sure that a piece with equal height is on the right and left. example: God this is a horrible splicing job, but you get the idea.  So your 8th splice needs to go all the way to the end of the pic. you cant have splices interrupting other rows of other splices. The 12th one needs to be matching height with the "back to my profile" button as well as some other changes. hopefully you get the idea from this post. |
theeggman85Mar 14, 2009 10:22 PM
|
Apr 1, 2009 6:26 AM
#7

| but i want my sig updares ont the left not rightbut i want my updates box on the left not right any help please |
 |
Apr 1, 2009 3:51 PM
#8
Legend said: but i want my sig updares ont the left not rightbut i want my updates box on the left not right any help please I'm sorry, but that really made no sense. |
|
Apr 2, 2009 3:29 AM
#9

| i spent over 1hour trying to fix my sig because one of the slices did not fit by a single pixel i uploaded over 30 of the same pic with dif measurements LOL but i got it now :P uhh guys if you highlight my signiture you can see a gap between the updates and top is that suppose to happen? o.o |
 |
Apr 2, 2009 4:31 PM
#10
huyyy said: i spent over 1hour trying to fix my sig because one of the slices did not fit by a single pixel i uploaded over 30 of the same pic with dif measurements LOL but i got it now :P uhh guys if you highlight my signiture you can see a gap between the updates and top is that suppose to happen? o.o no its not supposed to happen but since you have a white border anyway it doesnt seem to really matter. |
|
Apr 2, 2009 4:47 PM
#11

| Just a tip to make slicing easier in Photoshop: You should have a plain MAL generated sig saved on the PC. Open that file in Photoshop, and copy paste it on your sig, move it where you want it, so it looks something like this: 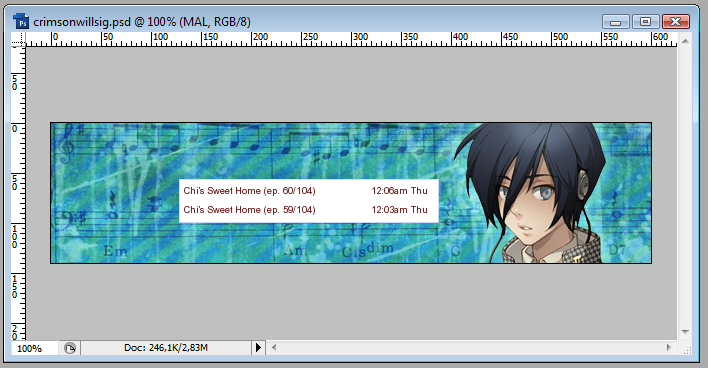 Before using the slicetool make sure, that the layer with the plain MAL sig is the active layer. Now trace along the sides to create the slice. After that Photoshop will automatically generate the slices, but unfortunately PS slices horizontal not vertical. So you have to adjust the height of the slices, wich is pretty easy: just right click on the slice with the slicetool and you will see an "edit slice" option. There you can change the height. Best to start is with the slices next to the MAL part, and make the the same height as the MAL part. When slices are ready don't forget to delete the layer with the MAL part on. After that go to Save for Web and Devices, and there you can save all the slices in separete files. Hope it made sense. If it did not, I can make a tutorial with pics, but only after I woke up...man I'm sleepy... |
 |
Apr 12, 2009 2:16 PM
#12

| guys need help my MAL list does not fit into the rest of the sig |
Ryuki-kunApr 12, 2009 2:27 PM
 |
Apr 12, 2009 2:56 PM
#13
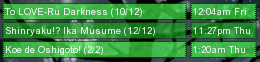
Ryuki-kun said: guys need help my MAL list does not fit into the rest of the sig It's because the slicing is wrong. The MAL part's height is 62 px, the othher middle part's height is 70px. Contact the one who made it, and ask him/her to re-do the slicing. |
|
Apr 12, 2009 2:59 PM
#14
SunyiNyufi said: Ryuki-kun said: guys need help my MAL list does not fit into the rest of the sig It's because the slicing is wrong. The MAL part's height is 62 px, the othher middle part's height is 70px. Contact the one who made it, and ask him/her to re-do the slicing. thanks for the help |
|
Apr 12, 2009 4:44 PM
#15

| Uhh... looking at the original post, it should fit. It's probably because your sig settings are incorrect. :[ Or it could be a combo of both since in the original, all the slices in the 2nd row are the same height. |
    There is nothing in this world more ugly than imperfection |
Apr 12, 2009 5:05 PM
#16
Kyora said: Uhh... looking at the original post, it should fit. It's probably because your sig settings are incorrect. :[ Or it could be a combo of both since in the original, all the slices in the 2nd row are the same height. The problem is that the sig wasn't sliced according to the standard heiights of the MAL generated part. MAL part with 3 updates rows is 62px, with 4 updates rows 80px (in both cases the "Recent Anime/Manga" part is hidden). Actually most of the time, when slicing goes wrong, it's cos of the MAL part. That's why I advise everyone to have a plain MAL generated sig saved on the PC. I myself have one with 2 rows (and timestamp), and one with 1 row (without timestamp, but with the longest anime display title). If you use this while making a sig, than you really just can't get the slicing wrong. Cos if you have the layer with the MAL generated sig selected while slicing, the slice will be the same size as the MAL part ^^' |
|
Apr 12, 2009 5:48 PM
#17
SunyiNyufi said: Kyora said: Uhh... looking at the original post, it should fit. It's probably because your sig settings are incorrect. :[ Or it could be a combo of both since in the original, all the slices in the 2nd row are the same height. The problem is that the sig wasn't sliced according to the standard heiights of the MAL generated part. MAL part with 3 updates rows is 62px, with 4 updates rows 80px (in both cases the "Recent Anime/Manga" part is hidden). Actually most of the time, when slicing goes wrong, it's cos of the MAL part. That's why I advise everyone to have a plain MAL generated sig saved on the PC. I myself have one with 2 rows (and timestamp), and one with 1 row (without timestamp, but with the longest anime display title). If you use this while making a sig, than you really just can't get the slicing wrong. Cos if you have the layer with the MAL generated sig selected while slicing, the slice will be the same size as the MAL part ^^' Ahh right okay, that's what I meant by a "combo of the two" earlier, that the slicing was incorrect. xD I have a copy of the default 2 rows and 3 rows saved (I just don't remember the dimensions off the top of my head D:), but maybe it would help to post a copy somewhere on the club as well, maybe? |
There is nothing in this world more ugly than imperfection |
Apr 12, 2009 5:56 PM
#18
Kyora said: Ahh right okay, that's what I meant by a "combo of the two" earlier, that the slicing was incorrect. xD I have a copy of the default 2 rows and 3 rows saved (I just don't remember the dimensions off the top of my head D:), but maybe it would help to post a copy somewhere on the club as well, maybe? I don't think it's necessary, and if we wanted to have such thing, then we should have all versions...i mean different rows... with time without time... with hie "Recent Anime/Manga" without hide... But well of crouse if someone collects them, I'm fine having it, I'm just too lazy to do it myself :P :D |
|
Apr 15, 2009 12:00 PM
#19

| Could someone help me with mine please? I think I got it right, but when I hit update it only shows the MAL part. This is what I type:     And this is what shows up:  (and sorry, I have no idea why the spoiler became a link) |
theeggman85Apr 15, 2009 6:21 PM
~ Nothing makes us as lonely as our own secrets ~  |
Apr 15, 2009 6:23 PM
#20
| fixed ur post, you were just missing a [/url]. you're very close, all you need to do is take that entire code for the sig and put in un ur signature settings. If you did that, I really don't know why it wouldn't work for you... Well I added that [/url] on your post, maybe somehow that would help...? |
|
Apr 16, 2009 1:03 AM
#21
| Nope, it's still not working (j_j) As soon as I paste the code and click update, it keeps going back to those same 2 lines of code. No other picture has ever shown up. Should I talk to Xinil? |
37wallflower73Apr 16, 2009 1:18 AM
~ Nothing makes us as lonely as our own secrets ~ |
Apr 16, 2009 9:20 PM
#22
| It seems that there was an unclosed [img] tag in there also, between the mal part and 'RightMiddle' image. Copy and paste the following, and it'll work just fine: [url=http://myanimelist.net/animelist/37wallflower73&sclick=1][img]http://i206.photobucket.com/albums/bb85/37wallflower73/Do%20Not%20Move/Sig1_Top.png[/img] [img]http://i206.photobucket.com/albums/bb85/37wallflower73/Do%20Not%20Move/Sig1_LeftMiddle.png[/img][img]http://myanimelist.net/signature/37wallflower73.png[/img][img]http://i206.photobucket.com/albums/bb85/37wallflower73/Do%20Not%20Move/Sig1_RightMiddle.png[/img] [img]http://i206.photobucket.com/albums/bb85/37wallflower73/Do%20Not%20Move/Sig1_Bottom.png[/img][/url] |
I am a banana. |
Apr 19, 2009 3:11 AM
#23
| Thanks for helping me.....but it still doesn't work. Nothing shows up but the MAL part |
~ Nothing makes us as lonely as our own secrets ~ |
Apr 19, 2009 10:04 AM
#24
37wallflower73 said: Thanks for helping me.....but it still doesn't work. Nothing shows up but the MAL part I'm confused... because it shows up just fine: ...just copy the bbcode, and paste it here: http://myanimelist.net/editprofile.php?go=forumoptions#sigform ...hit update and it'll show up fine. It's a nice sig, btw. :) Maybe you wanted it to show timestamps or something? ...then just change it on signature settings: http://myanimelist.net/editprofile.php?go=signature |
I am a banana. |
Apr 20, 2009 2:12 PM
#25
| Thanks! Seems I was posting it in the wrong area. I can be such an idiot -_-' |
~ Nothing makes us as lonely as our own secrets ~ |
Apr 23, 2009 11:26 PM
#26

| Ok, I'm still doing something wrong... I think. I'm sorry to bother you guys, I know your all busy. I tried to size the center one for 3 updates-I think theeggman85 said that was 62 high and 260 wide... if I remember correctly. I sized it to that, then tried to put it together with the others, and I got this. I can't seem to get them to sort out right for some reason. When I tried to put it together I got this.      And how do I get rid of the "Windeen's recent Anime & Manga" So it just reads "Windeen's Updates"? Thanks in advance! |
windeen-windyApr 23, 2009 11:30 PM
 |
Apr 23, 2009 11:38 PM
#27

windeen said: Ok, I'm still doing something wrong... I think. I'm sorry to bother you guys, I know your all busy. I tried to size the center one for 3 updates-I think theeggman85 said that was 62 high and 260 wide... if I remember correctly. I sized it to that, then tried to put it together with the others, and I got this. I can't seem to get them to sort out right for some reason. When I tried to put it together I got this. And how do I get rid of the "Windeen's recent Anime & Manga" So it just reads "Windeen's Updates"? Thanks in advance! I one problem is I think you need to set your image type to "Recent Anime Updates" profile edit>My signature Its in the Options and Colors section. Also by the look of your sig I would say you would set "How many recent entries for anime/manga should be displayed?" to 3. Thats right under image type drop box. |
 |
Apr 24, 2009 12:00 AM
#28
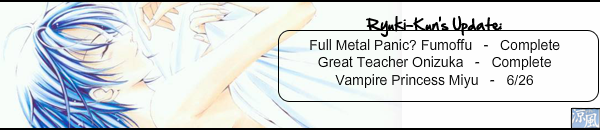
| This is what it would look like, but you're going to have to reslice it since there is no configuration you can use for the mal part that would fit that slice. For that slice you have to use one of the set dimensions that mal uses for those. I recommend copying the signature mal generates and pasting it into photoshop, so you can use that as a reference for your slices (the slice edges should snap to the edges of the layer when you drag them). Just hide the layer before exporting. The layout below is using 3 updates at 260x62px  edit: added the italic bit for clarity |
sakaApr 24, 2009 12:17 AM
I am a banana. |
Apr 24, 2009 12:52 AM
#29
| Ok, thank you both. I'm using Adobe Photoshop elements 3.0, so I wasn't sure if it was a problem with the way I made it on there or what. I will follow your directions later and give that a try, I've not worked with a system like this before so I'm still really bad at it in some ways. Thnaks a lot! BTW-Roxkis: What Anime is that in your Sig ppicture? If you don't mind me asking? It's cool looking. |
| |
Apr 24, 2009 5:03 AM
#31
windeen said: Ok, thank you both. I'm using Adobe Photoshop elements 3.0, so I wasn't sure if it was a problem with the way I made it on there or what. I will follow your directions later and give that a try, I've not worked with a system like this before so I'm still really bad at it in some ways. Thnaks a lot! BTW-Roxkis: What Anime is that in your Sig ppicture? If you don't mind me asking? It's cool looking. lol i wonder how old is ps 3.0, and i think the image in roxkis sig is probaly fanart |
|
Apr 24, 2009 5:33 AM
#32
huyyy said: windeen said: Ok, thank you both. I'm using Adobe Photoshop elements 3.0, so I wasn't sure if it was a problem with the way I made it on there or what. I will follow your directions later and give that a try, I've not worked with a system like this before so I'm still really bad at it in some ways. Thnaks a lot! BTW-Roxkis: What Anime is that in your Sig ppicture? If you don't mind me asking? It's cool looking. lol i wonder how old is ps 3.0, and i think the image in roxkis sig is probaly fanart lol, I've had my 3.0 since 2004-I have some newer versions of it.Bbut I don't like them. So I don't use them as much as my 3.0. They annoy me and I haven't been able to afford anything else since 2007. So I keep going back to 3.0 |
| |
Apr 24, 2009 7:04 AM
#33
windeen said: huyyy said: windeen said: Ok, thank you both. I'm using Adobe Photoshop elements 3.0, so I wasn't sure if it was a problem with the way I made it on there or what. I will follow your directions later and give that a try, I've not worked with a system like this before so I'm still really bad at it in some ways. Thnaks a lot! BTW-Roxkis: What Anime is that in your Sig ppicture? If you don't mind me asking? It's cool looking. lol i wonder how old is ps 3.0, and i think the image in roxkis sig is probaly fanart lol, I've had my 3.0 since 2004-I have some newer versions of it.Bbut I don't like them. So I don't use them as much as my 3.0. They annoy me and I haven't been able to afford anything else since 2007. So I keep going back to 3.0 *cough*torrents*coughhh* =.] <<< it has a mole :) |
|
Apr 24, 2009 9:29 AM
#34
huyyy said: windeen said: BTW-Roxkis: What Anime is that in your Sig ppicture? If you don't mind me asking? It's cool looking. i think the image in roxkis sig is probaly fanart Looking at the render I think its from a game but i'm not to sure The renderV  |
|
Apr 24, 2009 12:18 PM
#35
Roxkis said: Looking at the render I think its from a game but i'm not to sure It seems to be from an eroge called Vagrants made in 2003 (from Studio e.go!, obviously) edit: ...and here's a pic (notice anyone familiar?) ...seems to be rpg style:  |
sakaApr 24, 2009 12:26 PM
I am a banana. |
Apr 24, 2009 1:28 PM
#36
Roxkis said: Looking at the render I think its from a game but i'm not to sure The renderV Ok, Thanks, It really is cool looking, I was just curious ^^ |
| |
Apr 24, 2009 3:28 PM
#37
saka said: Roxkis said: Looking at the render I think its from a game but i'm not to sure It seems to be from an eroge called Vagrants made in 2003 (from Studio e.go!, obviously) edit: ...and here's a pic (notice anyone familiar?) ...seems to be rpg style: OK im dense, what is that pic from |
|
May 9, 2009 4:10 PM
#38

| Ok, I'm definetly doing something wrong...can anyone help me out please???? |
     |
May 9, 2009 6:30 PM
#39
TakeMeFarAway said: Ok, I'm definetly doing something wrong...can anyone help me out please???? you're really close. you just need to change your signature settings here: http://myanimelist.net/editprofile.php?go=signature ...so that they look like this:  It also wouldn't hurt to put a return after each row of images in the bbcode... to have pity on those unfortunate enough to have internet explorer.  |
I am a banana. |
May 10, 2009 12:16 AM
#40
saka said: It also wouldn't hurt to put a return after each row of images in the bbcode... to have pity on those unfortunate enough to have internet explorer. !! loool IE does that? haha |
|
May 10, 2009 7:27 AM
#41
theeggman85 said: saka said: It also wouldn't hurt to put a return after each row of images in the bbcode... to have pity on those unfortunate enough to have internet explorer. !! loool IE does that? haha If the width of a block (or table) isn't explicitly defined (which the forum doesn't so that spoilers can expand) IE will not wrap inline images automatically. I'm not sure if IE8 still has the problem, but I wouldn't be surprised. I bet Xinil could have put a workaround in for it... maybe I'll look for a fix, since it seems to happen frequently. Stupid IE. |
I am a banana. |
May 10, 2009 9:26 AM
#42
saka said: TakeMeFarAway said: Ok, I'm definetly doing something wrong...can anyone help me out please???? you're really close. you just need to change your signature settings here: http://myanimelist.net/editprofile.php?go=signature ...so that they look like this: It also wouldn't hurt to put a return after each row of images in the bbcode... to have pity on those unfortunate enough to have internet explorer. Unfortunatly, my Options and Colors section isn't like that. Instead, it goes: Width: px 341 - 600 Box Color: Red: , Green: , Blue: Background Color: Red: , Green: , Blue: Border Color: Red: , Green: , Blue: Text Color: Red: , Green: , Blue: MAL Color: Red: , Green: , Blue: Link Color: Red: , Green: , Blue: Hide MAL Ad: Hide that ad! Nah, I like the MAL promoting! And that's all it has. So I don't have the first entry option, the remove time stamps option, and the hide title option. And thats why I'm really confused :( |
|
May 10, 2009 10:09 AM
#43

| That's because you have the image type on "Custom - Recent anime updates" You should set it to "Recent anime Updates" |
May 10, 2009 12:09 PM
#44
sharoek said: That's because you have the image type on "Custom - Recent anime updates" You should set it to "Recent anime Updates" ^ that is indeed the problem ;) |
I am a banana. |
May 10, 2009 12:12 PM
#45
| Oh! Wow, I feel dumb :( But, THANKS FOR ALL OF YOU HELP!!!!!!!!! THIS TUTORIAL WAS AWESOME! |
|
May 10, 2009 12:18 PM
#46
| Crap!!!! I'm so sorry I'm having all of this trouble, but I have everything set, so when I hit "preview signature" everythings fine...it's perfect. But now it's not the same on the forum as it is in the "preview signature" even though I save it... Gah! So many problems!!! |
|
May 10, 2009 12:25 PM
#47
Use the bbcode below for your signature (copy and paste it):[center][url=http://myanimelist.net/animelist/TakeMeFarAway&sclick=1][img]http://i77.photobucket.com/albums/j56/lovealchemist/signature_01-1.jpg[/img] it should come out like this: |
I am a banana. |
May 10, 2009 12:25 PM
#48
| Lol dont worry about that =P It's because you're using internet explorer ;) On mozilla Firefox , you sig looks completly normal but on ie it just looks an totally mess just like with most of the sig's on MAL |
May 10, 2009 12:38 PM
#49
| OOooooh, ok. Well, thank you guys SO MUCH! Sorry if I've been a bother* * because I'm completely clueless! ;) |
|
More topics from this board
» Club Main Picture requestAegidrom - Apr 3, 2019 |
0 |
by Aegidrom
»»
Apr 3, 2019 10:47 AM |
|
Sticky: » Signature Request Thread ( 1 2 3 4 5 ... Last Page )theeggman85 - Jan 5, 2009 |
5694 |
by S-quare22
»»
Oct 21, 2017 9:48 AM |
|
Sticky: » Profile Pictures Request Thread ( 1 2 3 4 5 ... Last Page )theeggman85 - Jan 5, 2009 |
2035 |
by Linkon18
»»
Oct 13, 2016 5:18 PM |
|
» MascotVoidran - Jul 1, 2016 |
0 |
by Voidran
»»
Jul 1, 2016 1:36 PM |
|
» [Request] Profile BannerShinraSora - Jun 5, 2016 |
0 |
by ShinraSora
»»
Jun 5, 2016 6:42 PM |